Hiking in cold weather, even as cold as 10 degrees, can be, with the right clothing and preparation, not only doable but even enjoyable.
To hike in 10-degrees, you’ll need wool socks, long underwear top and bottom, lined pants, two insulating layers, a windproof outer jacket, a warm hat, and mittens.
There’s a saying in Norway and it goes something like this: “There is no such thing as bad weather, only inappropriate clothing.” Because the saying is Norwegian, then you know they’re talking about one thing – cold!
By the way, as an Amazon Associate, I earn when buying qualified products through links on my site.
While hiking in temperatures well below freezing may not be for everyone, there is no reason you can’t go outside and enjoy the day, even in the coldest weather. The key is to dress in layers that make sense and keep moving to stay warm!
Dressing For 10-Degree Weather While Hiking
There are lots of things to do to prepare for hiking in cold weather, I’ll go over the clothing ensemble first and then I’ll get to some tips on how to hike in the cold.
The Base Layer
Starting from the innermost layer, also called the base layer, there are a couple of things to keep in mind. Choosing the right material for your base layer can be tricky. Conventional wisdom nowadays says that cotton should be avoided at all costs.
From my own experience, as well as from what I’ve been researching in studies like this one. If you are active, then whether your base layer is wool, polyester, or cotton it makes less of a difference.
If you are just standing or sitting around, then a synthetic or wool base layer might make a big difference.
If you’re planning on stopping at the peak of a hill or somewhere like that, you might want to skip the cotton. If you’re hiking for exercise only and plan to only stop when you get back to your car or house, then it doesn’t matter so much.
The second thing is to have a base layer for your upper half as well as your lower half. Long underwear, long johns, union suit, whatever you want to call it, you need it!

The Bottom Half – The Pants
The importance of having your feet warm and toasty cannot be overstated. The best system is to have two layers of socks – a thin, non-cotton layer first, then a thicker wool layer. The socks should be tall.
The first thin layer of sock is mean to keep your feet dry (hence a wicking material is very important) and avoid friction. Wet socks = more friction + more misery.
Choosing your shoes can be tricky. If you are hiking a couple of miles on flat-ish ground (well-established trails) and if there is snow and the snow is not deep enough to go into the top of your shoes, then hiking shoes will work okay.
If you’re hiking in the kind of snow that’s deep enough to wade through or cover the tops of your shoes then you might want to go with a pair of full snow boots with gaiters, but they will slow you down somewhat.
Since it’s well below freezing, the snow is going to stay very dry, which is a good thing. The worst thing to happen is for your feet to get wet.
What To Do If You Don’t Have Snow Boots
If you don’t have snow boots but you want to keep your feet dry, you can do this hack that I employed this last winter to hike and run around in snow:

I put a pair of socks on followed by a plastic bag, followed by another pair of socks. This plastic bag acted as a water barrier to prevent snow from melting from my body heat and seeping into my socks. Although my bottom layer of socks got wet from my sweat, my feet stayed warm.
I will say that this isn’t the most comfortable situation and my toes complained of being crowded due to the 3 layers they were wearing (not counting my shoes).
With this set up I was able to go out in several inches of snow at about 9 degrees Fahrenheit for a full hour without issues.
If you are planning a multi-hour hike in the snowy wilderness, I would invest in some insulated snow boots.
What To Bring In Case Of Emergency Cold Feet
Some people choose to add little chemical warmer packets inside their boots. I suggest bringing some along, but saving them only if needed. You could end up with your feet too hot and sweaty, and that’s no fun either. Not to mention wet feet can be very bad if you’re stuck somewhere you weren’t planning on staying.
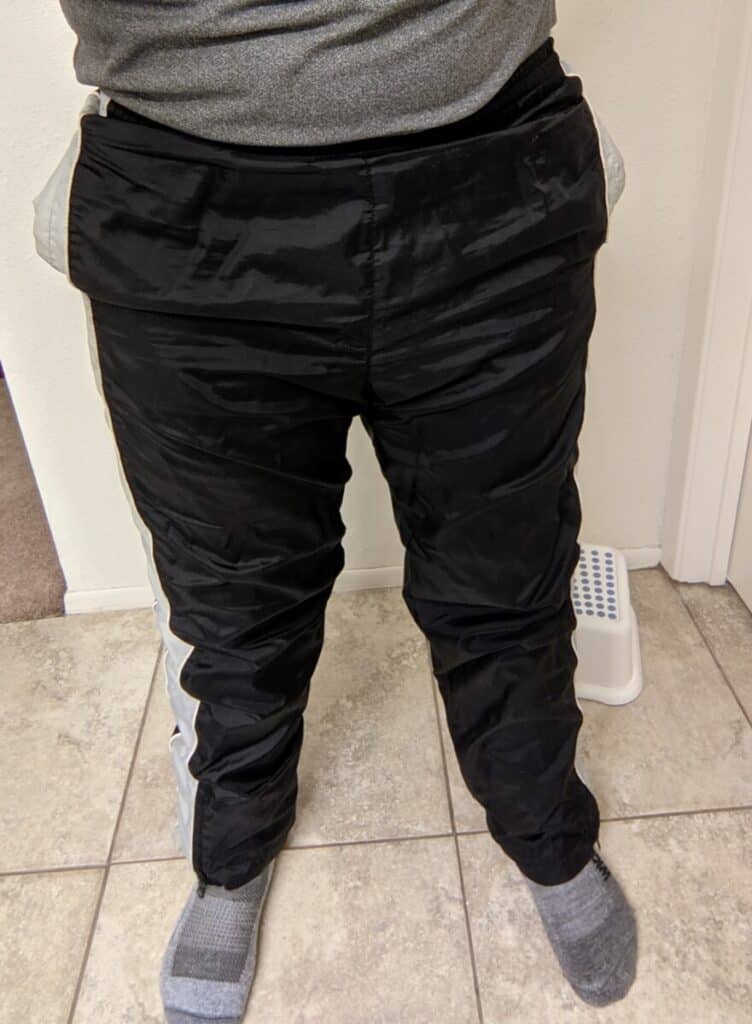
The Bottom Half – The Pants
The long johns will do wonders to keep your legs warm, but the outer layer is just as important. As your outer layer for your pants, you should not wear any absorbent material. That means jeans, sweat pants, or even standard hiking pants. All these types of pants absorb water and that’s not what you want. You can wear these types of pants underneath a waterproof shell without issues.
Instead, you should find pants that are windproof, and if possible, waterproof. A thick pair of ski pants are not necessary unless it’s really windy, just a good pair of windproof hiking pants or even running pants, and if they have a little bit of lining in them, all the better.
In my opinion, insulating mid-layer pants work really well and help to keep you warm in these conditions. If your hiking pants / running pants don’t have a lining, then I would wear sweat pants or another type of pants that would work as an insulating layer underneath the windproof/waterproof shell.
All this to say, if you are going to be hiking in deep snow up to your knees, then you need snow pants. Snow pants are insulated and they are waterproof, which is an absolute must in these types of conditions.
The Top Half – The Mid-layer (Insulating Layer)
Over your base layer of long sleeve long underwear, you’ll need a warm, insulating layer like a wool sweater or a fleece. A thick flannel-type shirt can be good too because you can tuck it in, and that keeps cold air from getting up and under.
My favorite mid-layer is my fleece I got from Old Navy about 10 years ago.

The mid-layer material is less important as long as it’s thick enough to insulate your body. The thicker the more insulation. A t-shirt or something like that is not enough to be a mid-layer in cold weather.
Additionally, this jacket has the throat-choke feature which is uncomfortable but to me is one of my favorite features. It’s essential to keep your neck warm, so if you don’t have a jacket that does this you need to use a scarf, balaclava, or the ever-more popular buff (Amazon).
The Top Half – The Jacket
After that thick layer, ideally, you need a jacket that has either a down inner-layer or some other insulating layer. But if you are insulated well enough with your mid-layer than this is less of an issue.
However, most importantly your jacket must have a windproof outer shell. A hood makes a tremendous difference in keeping your head and face warm, but it might reduce your visibility.

My Columbia rain jacket (see my recommended gear page to learn more about it) along with my fleece I showed earlier in this post as well as my trusty blue hat worked extremely well to stay warm that morning.
The Top Half – A Hat (or Two)
Maybe the most important piece of equipment is a warm hat. Body heat escapes upward in a way, and a hatless head gets very cold very fast. Another layer under your main hat, such as a balaclava is helpful to have because you can use it to cover your face. A scarf is a good idea but optional for hiking because it adds a lot of bulk and can get in the way.
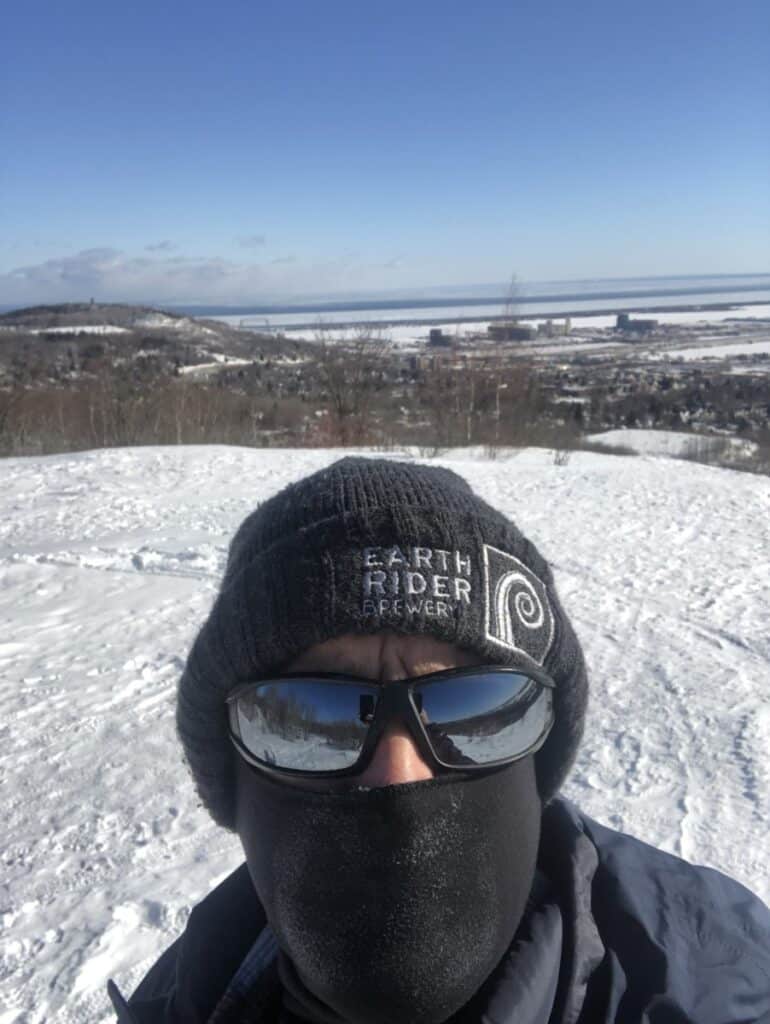
I’ve found that in these conditions that face warmth can’t be understated. Recently I tried to sleep in 18-degree Fahrenheit weather in my tent and I found that the most miserable part of my body was my face because I didn’t have a face cover.
Anyway, while hiking, a face cover is a great idea. Even a pair of sunglasses can make a big difference in blocking airflow to prevent those cold watery eyes.
The Top Half – Mittens (yes mittens)
You might think that because you spent over $100 on your gloves that they’ll be good enough for the serious cold. They’re not. If you’re going to be outside for more than an hour, and the temperature is 10-degrees or lower, mittens are the only way to go.
Mittens keep your fingers together which adds heat. The downside is you have no dexterity, and you can’t do anything with them on, but that’s a small price to pay for warm hands. Chemical warmer packets are an option for your hands as well.
More Tips for Hiking in the Cold
So you’re all suited up and ready to head out the door into the cold – here are some things to keep in mind, and keep you hiking no matter the weather.
Stay Hydrated
Everyone knows to drink plenty of water in hot weather, but it’s no different for cold weather. You may not be sweating as much, but your body still needs to replenish fluids.
Some tips:
- Avoid summer hiking hydration gear like Camelbacks. The tube will just freeze up.
- Use a water bottle instead, and maybe even an insulated thermos to keep your water from freezing. It might make it more pleasant to drink as well if the water is not super cold.
- If you are on a long hike then you need to keep your water on your body to keep it warm.
Keep Snow Away
Try not to let snow get next to your body, especially inside your boots. Your body heat will melt the snow, and then you’ll have wet socks and feet. If you fall, brush off as much snow as you can.
For this reason, the outer shell should be waterproof, and should not be fabrics like wool for the outermost layer. Snow just sticks to wool like velcro. With other outer shells, snow just glides off.
Watch the Daylight
The daylight hours get short in the winter, so remember to plan accordingly. Start earlier in the day, and have a plan for when you’re going to finish and go home to sit by the fire. Always pack a headlamp or flashlight just in case things don’t go as planned.
Trail Conditions
Cold weather can make for great trail conditions or miserable trail conditions. Test out the snow you’re walking on. Is it firm? Will it hold your weight? Is it packed down? If the answer is yes to these questions, then it’s a good day to hike.
If the answer is no, and you find yourself post-holing (every step you sink into the snow several inches or even more) and fighting for each step, you may want to try another day, or maybe keep your hike very short. Hiking in deep snow can be a terrific workout, but it’s only something you should do when you can get back to non-deep snow without much effort.
What about Snowshoes?
Snowshoes are great to have, but they’re really only useful for fresh, deep snow. If you’re on a packed trail, you won’t need them, and you might find that they just slow you down. If you want to explore off-trail, then a pair of snowshoes (or skis) is the only way to go.
Have Fun!
Snow and cold get a bad rap, but the truth is, if you’re prepared, it can be a lot of fun to be out there in a winter wonderland. It can be stunningly beautiful, and there are so many things to see and discover that only reveal themselves in the colder months – ice crystals, animal tracks, frozen waterfalls, and frozen fog that delicately flocks the trees. The winter can be quiet and peaceful – a nice contrast to summer’s hectic pace and noise. Enjoy it!
Communication – Tell Someone Where You’re Going
Worst-case scenario – you’re by yourself, it’s cold, it’s really cold, it’s getting dark, and you’ve managed to badly injure yourself in a fall. You check your cell phone. Either you forgot to charge it enough, or the cold has simply killed the battery, and now it’s coming for you! Not good.
It’s cold. It’s winter. Don’t mess around. Make sure someone knows where you are, and when you plan to be back. It’s old school. It’s low-tech. It’s simple. It works. And you get to hike again another day!