Soaked socks? Slippery soles? This is your go-to guide for crossing shoes that will never let you down!
Many shoes can be used as crossing shoes for backpackers. Some of these include toe shoes, Crocs or even just a trusty pair of sneakers. There are also DIY options that you can use in a pinch or adapt to your personal backpacking needs.
This is just the start when it comes to picking the best crossing shoes. Keep reading and you’ll discover what makes these shoe options great and how you can make your very own crossing shoes!
By the way, as an Amazon Associate, I earn when buying qualified products through links on my site.
What Can Be Used As Crossing Shoes?
There are many shoes that won’t work very well as crossing shoes. High heels simply don’t belong in nature, flip flops typically have very little traction, and many don’t want to get their beloved Bob’s or Converse wet or dirty. So what do you use as crossing shoes?
The options below are great ones to consider when you’re looking for the perfect crossing shoes.
Chacos as Crossing Shoes (Can Be Used For Hiking)
Ahh… Chacos. They were all the rage several years ago. If you’re one of those who can successfully hike in Chacos without hurting your feet, then you are fortunate to be benefiting from Chacos open design!
Chacos will dry very fast, and if you have successfully hiked miles in your Chacos before, you may get away with only using your Chacos without any other shoe.
Not everyone digs hiking in these shoes, so make sure and go on smaller hikes to test these out as a hiking option.
Chacos don’t necessarily make the best option for lightweight backpackers if you are only using them for crossing since they are quite heavy–there are some other options here:
Supportive Sneakers
A solid pair of sneakers can be your best friend when it comes to crossing just about any water setting. Just make sure you have a quality pair that will be versatile enough for walking on land and helping you get through the water.
That means you’ll probably want to avoid going cheap. Look for something made from breathable materials in order to keep your feet cool and allow them to dry more quickly after crossing water. Additionally, arch support will help with keeping you comfortable as you walk.
Finally, be certain that the bottoms offer plenty of traction. Rocks and other surfaces in the water are likely to be more slippery than dry ground. Make sure you get something you can rely upon while on any surface.
Toe Shoes
Those who are a fan of going barefoot, but understand that it can be dangerous, may opt to look into toe shoes instead. These shoes are designed to fit differently from regular shoes. Instead of keeping all of your toes together, they allow each toe to have its own space.
Because of the fit, toe shoes are designed to feel much closer to walking around barefoot than any others out there. You’ll get the same level of comfort, but with better protection for your feet and improved traction to make sure you don’t lose your grip.
There are a number of different toe shoe brands out there to choose from, like Body Glove, Vibram, and JOOMRA. Vibram is one of the most recommended options out there, but the shoes you choose are entirely up to you.
Crocs
There are many who might scoff at this option, but there’s no denying that Crocs are a simple, inexpensive way to make your way through the water easily.
In addition, some Crocs feature “Croc lock”, which means they are like regular Crocs with some tread on the bottom, making these a bit more desirable for slippery river rocks.
On top of that, the open design of Crocs allows them to be extremely breathable, so they will dry very quickly. As a result, your feet will dry off in no time after making your way through the water.
They may not have the support you’re looking for, but at least they will protect your feet and make it past the river crossing. Any surface other than your bare feet will be a welcome alternative in any case.
Overall, these are a great option if you want something you can easily slip on and off for your trek through the water. They’re very lightweight as well, making them extremely easy to pack along as an extra pair of shoes.
DIY Options
Not everyone wants to risk getting their regular sneakers soaked or spend the money on a new pair of shoes just for camping and hiking. If this describes you, then a DIY option might be something you’re more interested in.
Crossing Tips
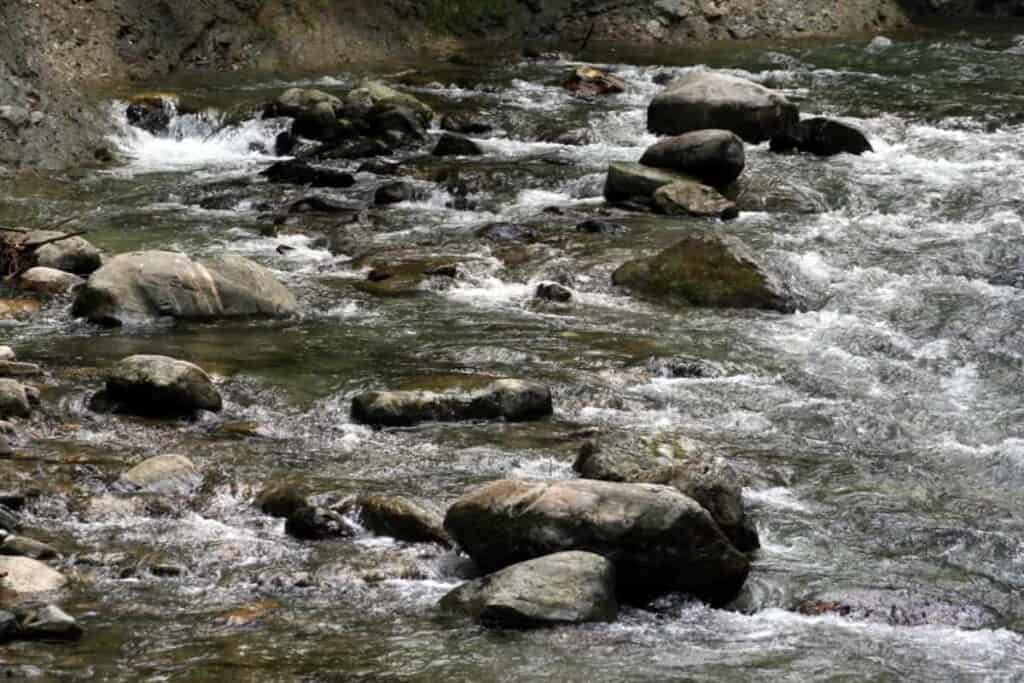
No matter what shoes you’re wearing, safety is immensely important when you’re crossing water out in the wilderness. The surface beneath you can be very slippery and the movement of the water can really affect your balance. Make sure to keep the tips below in mind and crossing water can be a much safer process.
Barefoot Crossing
I’ve totally been there. I didn’t want to get my shoes wet so I ended up taking off my shoes entirely and crossing the streams barefoot. If you are wearing tennis shoes, sometimes you might trust the traction of your feet more than the traction your shoes offer.
Barefoot crossing means you face the following risks:
- Cuts and abrasions on your feet
- Lack of support with a heavy backpack could damage your ankles or your foot itself (This is especially true since the ground underneath you is not solid, so your feet are having to provide more than the regular amount of support)
- Slipping (this is true of any crossing shoe, but your feet aren’t necessarily the most grippy thing out there)
All of these things can result in injured feet, and keeping your feet in good health is immensely important when you’re out in the woods. Happy feet means happy backpacking.
So, conversely, sad feet means a day full of misery. Don’t ask me why I know. 😉
Check The Water Speed
Water that is moving quickly will make it more difficult to keep your balance as you cross. Before you decide to step into the water, take a look around to see if you can find any areas that might have a less intense current or water that is at least more shallow.
Naturally, it would be annoying to fall into the water even if you aren’t potentially carrying your equipment on your back. Getting your pack wet could turn an annoying experience into a truly frustrating one. Instead, take the extra time to make sure you can cross safely. It will make the trip much better in the end.
If you do end up getting your clothes and other equipment wet, you’ll want to know how to get your clothes dry quickly. Learn how in our article on drying your clothes.
Avoid Waterproof Shoes
This tip might seem like it goes against common sense. However, keep in mind that waterproof shoes are often only waterproof as long as the water stays below the tops of the shoes. For very shallow puddles or rain, they can be awesome.
However, imagine walking through a foot of water. You’re likely to end up with water in your shoes anyway, thanks to the depth bringing water down into them. Once you get back onto land, the waterproof design can make it more difficult for the water in your shoes to dry out
Waterproof shoes are made out of an impervious material so that water can’t go in, which unfortunately means water can’t get out. Often, that means you won’t get dry feet until you have a chance to take those shoes off.
Meanwhile, shoes that breathe more easily might allow water in right away, but they’ll also allow your feet to dry out much more quickly when you’re done crossing.
Avoid Flip Flops
Flip flops make lousy crossing shoes because they are so open and thin that it’s easy for rocks to get under your feet while you’re crossing, which defeats the entire purpose of the crossing shoe. That being said, I’m sure people use them for crossing shoes, so it’s up to you.
Make Your Own Crossing Shoes
If you’re really looking to get creative, you can put together your very own crossing shoes. They don’t have to include anything too complicated.
For the most part, some of the materials that can be included in making your own crossing shoes are as follows:
- Socks (Could be SealSkinz or similar kinds of neoprene options)
- Sand
- Silicone Sealant
The sealant is something you’ll want to pair with the sealant placed at the bottom of the “shoes”. Resulting in greater traction, it will allow you to move more easily over slippery surfaces.
Furthermore, this is a recipe you can mold to fit your own unique needs. Try out different kinds of socks or materials that will allow for better traction. When you want full control over the results, this is a great option for you.
Neoprene socks are often already very useful for hikers and backpackers alike. If you’re new to using them, learning about the best Neoprene sock options out there will point you in the right direction. Learn about these options in our article on the best neoprene socks for hiking.
Use Garbage Bags
Sometimes, you just need something that will work in a pinch. Maybe you don’t hike or camp in places where you’ll need to cross water, or maybe you just hate having wet feet. Whatever your reason is, garbage bags are an option that can work when nothing else is available.
Just take a pair of garbage bags and tape them around each foot and leg over your shoe. You can also tie them if you want to avoid using tape, but keep in mind that the bags may not stay put quite as well. Either way, you’ll be able to make sure your feet stay dry, and there won’t be enough material between your shoes and the ground to affect your traction too much.