If you’re looking for secure knots, you’ve come to the right place. If you’re looking for the strongest knots, this is actually not the right place. Make sure to check out our article, here, if you are looking for strong knots.
Are you tired of not knowing which knot to use and when? Check out my free 5-day knot course! You will learn 1 essential knot per day with detailed video and picture instructions. And you’ll get it in your email! Check it out here.
Strong Vs. Secure Knots
Before I jump into which knots are the most secure, I want to briefly explain the difference between a strong knot and a secure knot–these may seem to be the same thing but they aren’t, actually!
By the way, as an Amazon Associate, I earn when buying qualified products through links on my site.
Strong Knots
Knots weaken the strength of a rope; a knot’s strength is really in how little it affects the rope’s natural strength. Many knots, in fact, will halve the amount of force the rope can withstand.
In other words, if a rope can hold 2000 lbs of force, with certain knots in the rope the strength of the rope decreases by 50% or more, to 1000 lbs of force.
Secure Knots
Secure knots, on the other hand, are knots that are meant to not slip. A secure knot won’t fall out if the load is applied and unapplied and applied again.
So if you’re looking for knots that are secure and you’re not trying to find the knots that can withstand the highest load, press on.
Most Secure Knots
There is no one single secure knot that you would use in every situation. Let’s dive into the most secure knots for different scenarios:
Most Secure Binding: The Double Surgeon’s Knot
A binding knot is a knot that secures a bundle. That bundle could be blankets, gear, tools, or even other rope (or even skin).
The Double Surgeon’s Knot follows a similar pattern to the square knot. (want to see how to tie the square knot? Check out my post, here)
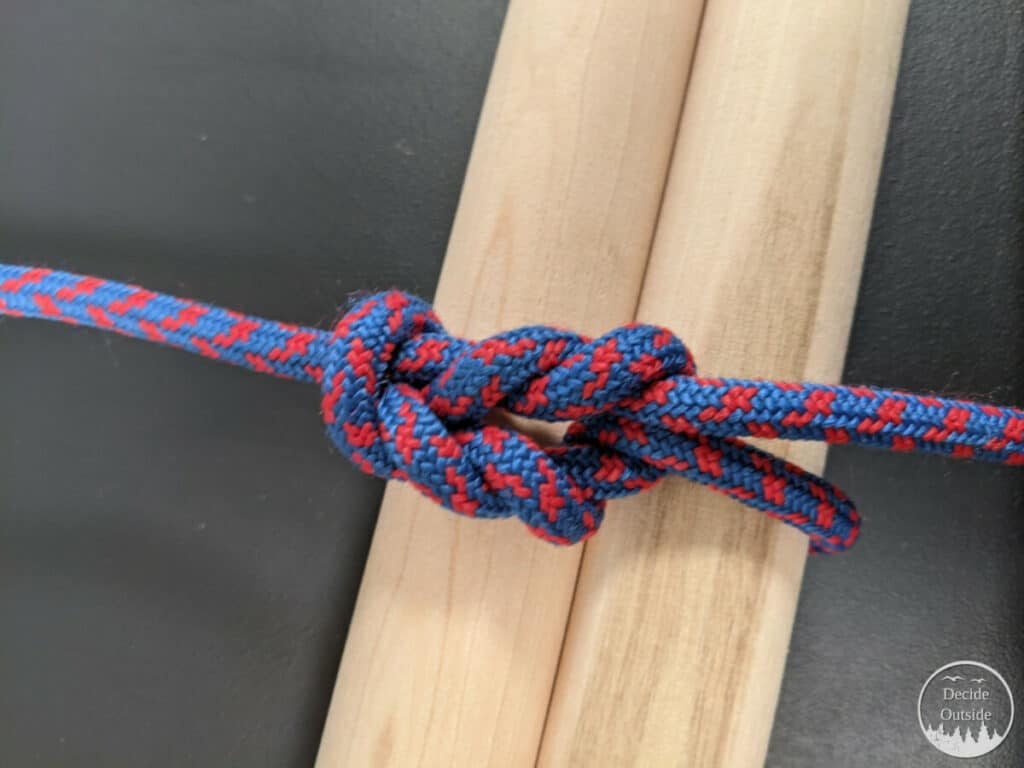
The double surgeon’s knot features multiple wraps internally around the knot which makes it resistant to slipping. The surgeon’s knot is called the surgeon’s knot because this knot has been used for tying sutures, although from what I’ve researched they use other knots, now–so it’s a fantastic knot that stays tied if you need it.
How To Tie The Surgeon’s Knot:
- Take two ends of a rope and wrap them around the object you want to tie around.
- Place the left end of the rope over the right end of the rope, forming an x
- Wrap the (now) right end of the rope under the right standing end of the rope
- Take the (now) right end of the rope over the left end of the rope
- Take the (now) left end and wrap it under the left standing end of the rope.
- Pull tight on the loose ends and standing parts of the rope
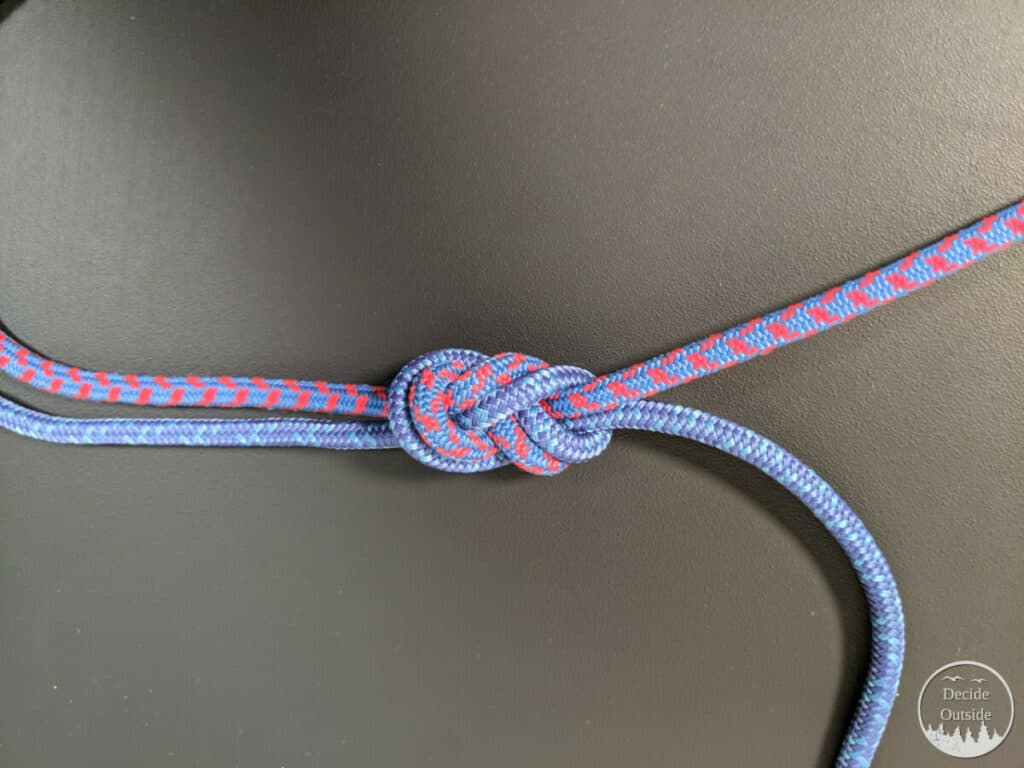
Most Secure Bend: The Carrick Bend
A bend is a knot that ties two ropes together.
The Carrick Bend is one of my favorite bends because of its security. It is made up of 4 interlocking half hitches. Furthermore, it’s ideal for tying in stiff rope where it’s difficult to manipulate the rope.

Although the Carrick Bend is secure under load, if you are putting on load and taking off load, if you didn’t give enough slack in your working ends, it’s possible for this knot to come undone. You *can* tie off the working ends in additional half hitches (or just give yourself plenty of slack in the working end).
How To Tie The Carrick Bend
This knot is tricky to describe in writing. I actually made a knot course where I show you ALL these knots in video tutorial format. You can check out my knot’s course here.
- Rope A on the left, Rope B on the right
- Make an underhand clockwise crossing turn with rope B, forming a window
- Put the end of Rope A underneath the window and bring it OVER the standing part of rope B
- Next, take Rope A and go under the working end of Rope B
- Next, bring Rope A Over the loop of the crossing turn of Rope B, and underneath itself (Rope A), and then over the other end of Rope B’s crossing turn
- Pull all ends, to fair it up, and then pull on the standing parts until the knot snaps into place to create the interlocking half hitches.
If you have a bend that will getting some tension and then losing that tension over and over again, I’d recommend the Flemish Bend instead. It’s a re-threaded figure of eight and when faired and tightened will stay secure. There is a reason why the Flemish Bend is a favorite among climbers, since you are constantly adding and removing load.
How To Tie The Flemish Bend
The Flemish Bend is just a re-threaded figure of eight knot, I’ll try and describe the instructions here, but if you want to see video instructions, make sure to check out my course where I teach you all the essential knots and where to use them.
- Tie a figure of eight knot in Rope A but let the figure of eight knot be loose and expanded so it’s easier to rethread
- Using Rope B, retrace the figure of eight knot made in Rope A taking care to make Rope B follow the same side of Rope A throughout the process.
- Tighten the knot carefully making sure Rope B is on top of rope A when the knot is fully tightened. You should count 4 parallel knot strands
Most Secure Hitch: the Double Anchor Bend
I know, I know… why is it a bend if it’s a hitch? Who really knows.
A hitch is a knot that secures a rope to an object.
The Anchor Bend is a secure hitch and isn’t too hard to tie, which is why I like it so much. A double anchor bend adds an additional wrap around the object adding extra security.
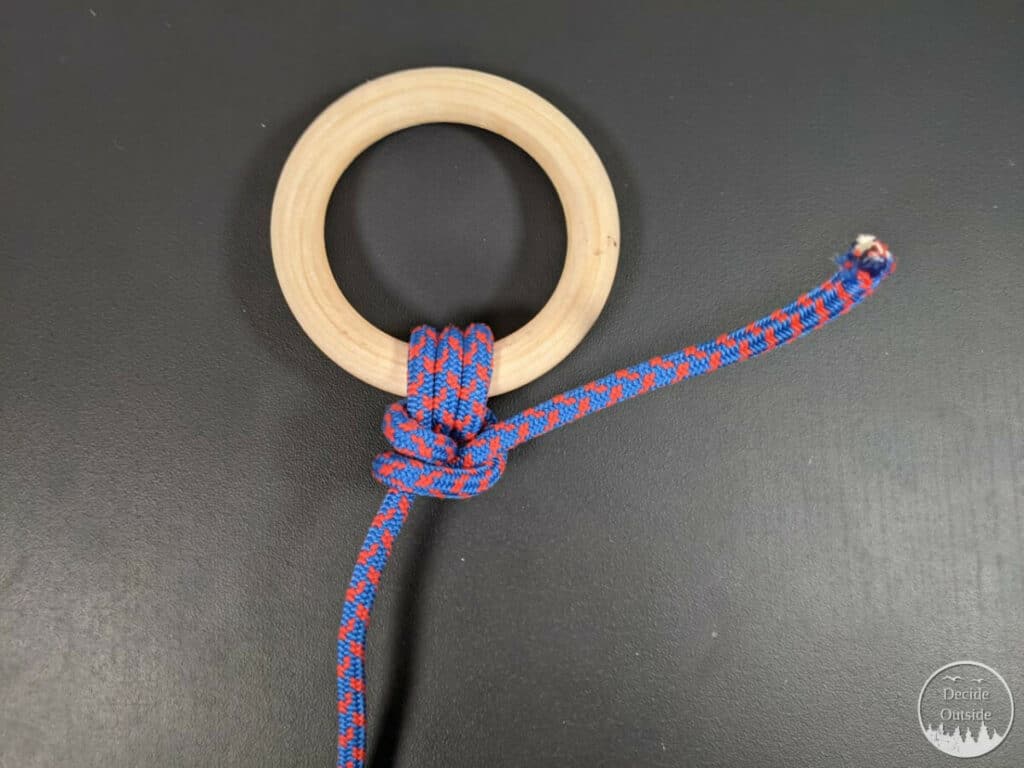
Notice the Double Anchor Bend has 3 wraps around the object you’re hitching around. This is fantastic for a hitch you want to ensure stays put (unlike the clove hitch where if you add or remove slack it can come undone pretty easily).
How To Tie the Anchor Bend
- Take your rope and make 2 full round turns around the object so you see three parallel lines on the object you’re hitching (see the picture)
- Take the working end and go over the standing part and through the opposite end of the round turns
- Take the working end and go over the standing part again and under and through itself to make a half hitch