I know how you feel. You run into a situation where you have some rope and something to tie but you have no idea which knot to use. So maybe you force a square knot into the situation or just make up something. It can be terrifying to rely on a made-up knot. Wouldn’t it be better if you knew just a few knots to work for almost all situations?
Well good–you’re in the right place.
I will teach you the best knots to know that will serve you in most circumstances. These knots won’t be perfect for every situation, but that’s not the point–you probably just want to know 6-10 knots rather than 60-100 knots.
By the way, as an Amazon Associate, I earn when buying qualified products through links on my site.
Some of these knots are a bit tricky, and to tell you the truth, you can actually get by using simpler knots. If you want to know the simpler knots and want to learn as few knots as possible, make sure to check out this article.
Table Of Contents:
- Double Fisherman’s Knot
- Sheet Bend
- Bowline
- Square Knot
- Constrictor Knot
- Alpine Butterfly
- Prusik
- Taut-line Hitch
- Anchor Bend
- Trucker’s Hitch
Are you tired of not knowing which knot to use and when? Check out my free 5-day knot course! You will learn 1 essential knot per day with detailed video and picture instructions. And you’ll get it in your email! Check it out here.
Double Fisherman’s Knot
The double fisherman’s knot is an extremely effective bend, or a knot used to tie two ropes together (glossary).
The Double Fisherman’s Knot is a strong and secure knot. HowNot2.com has data that shows that the double fisherman’s knot can sustain up to 19 kN. (depending on the strength of the rope, of course).
Furthermore, if you put a load on a double fisherman’s knot, there’s just not really any way that thing is coming undone–it’s a very secure knot.
Where a Fisherman’s Knot Can Be Used
- Rock Climbers often will use the Double Fisherman’s Knot in their rigging
- A fisherman’s knot can be used for tying together two fishing lines! (go figure). It’s a bit fiddly to pull off but it’s a superb bend for that
- Anytime you want to join two ropes where you want to not worry about the knot’s strength or security
How To Tie The Double Fisherman’s Knot Video Instructions
If you’d like to see the instructions for the single fisherman’s knot a bit more slowly, check it out here:
How To Tie the Double Fisherman’s Knot Picture Instructions
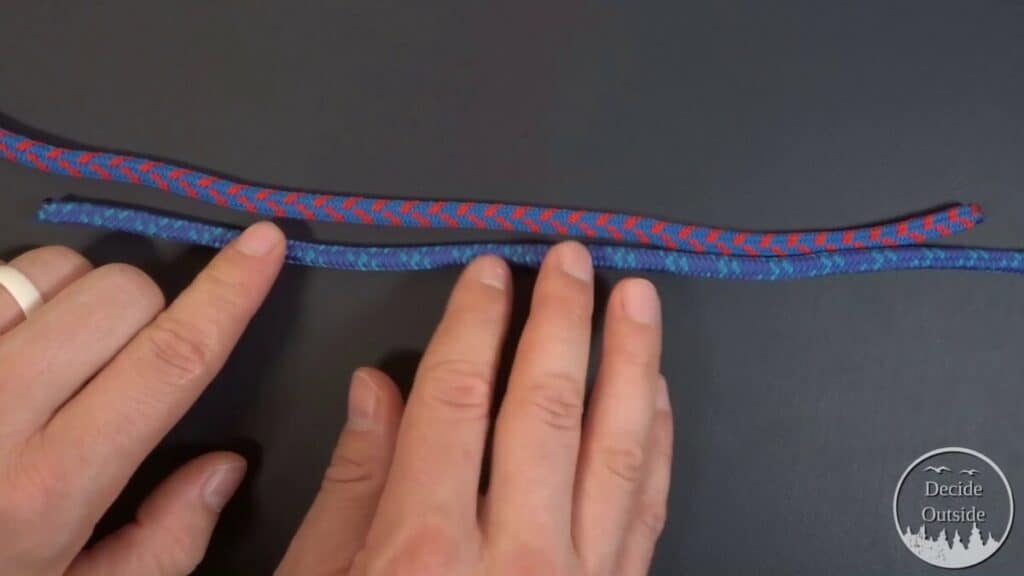
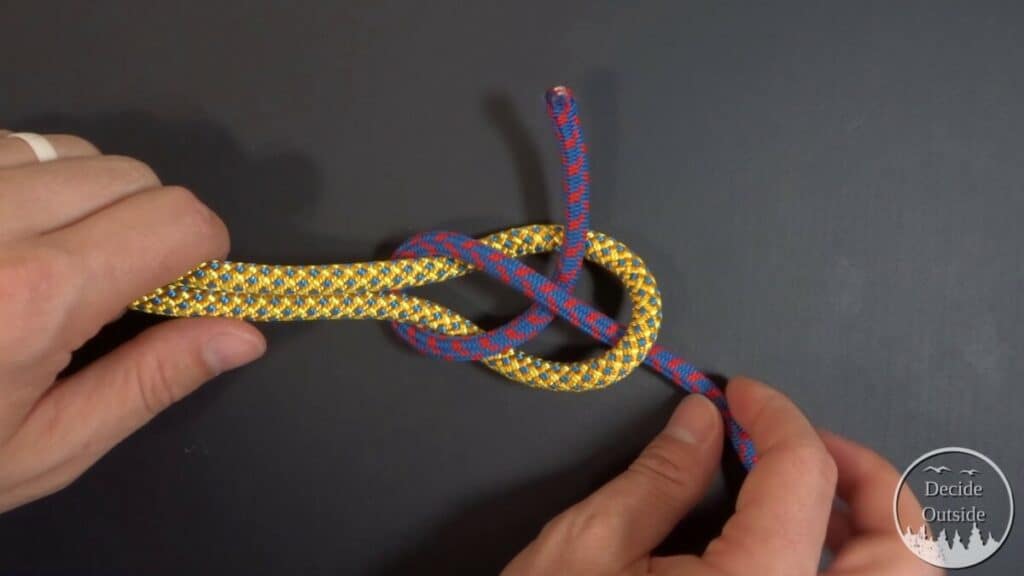
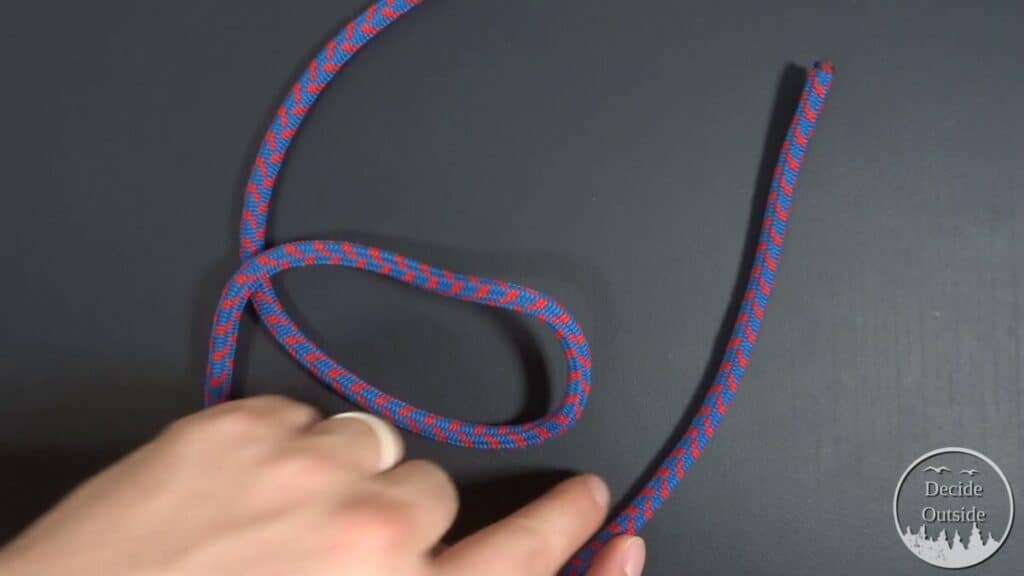
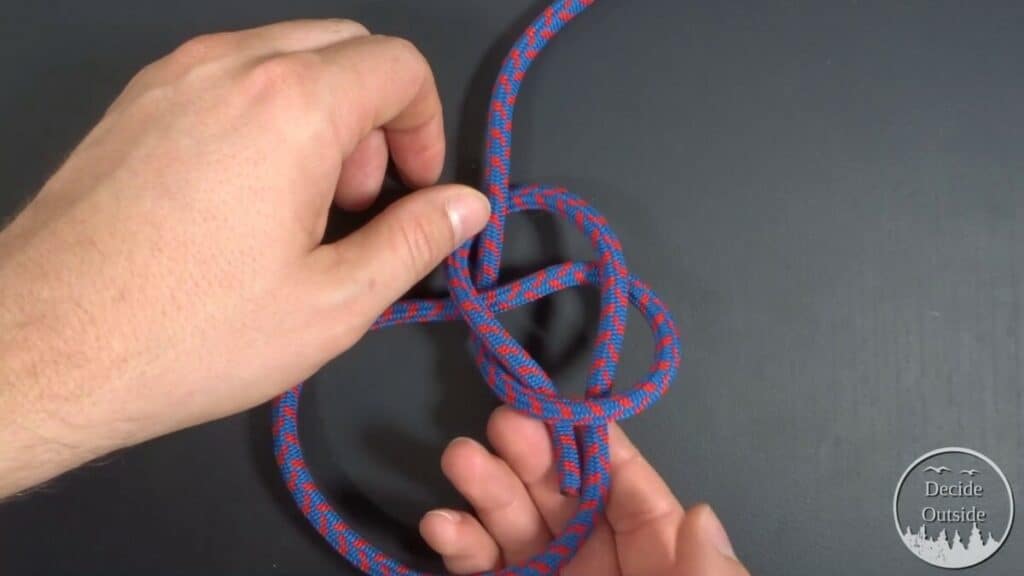
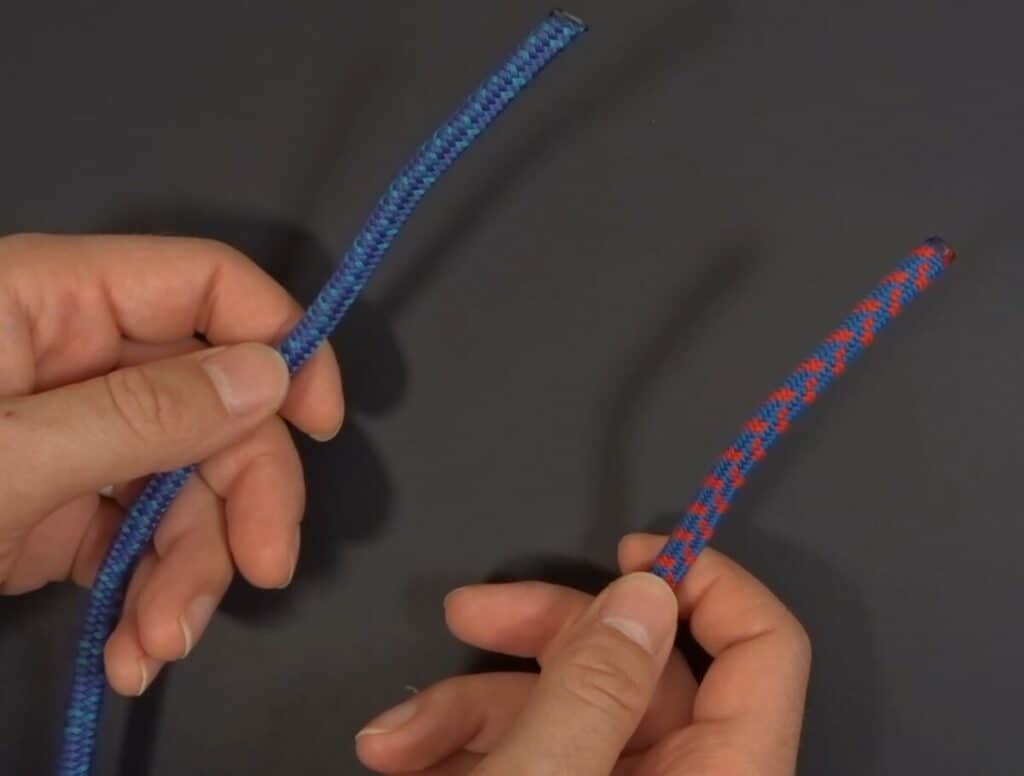
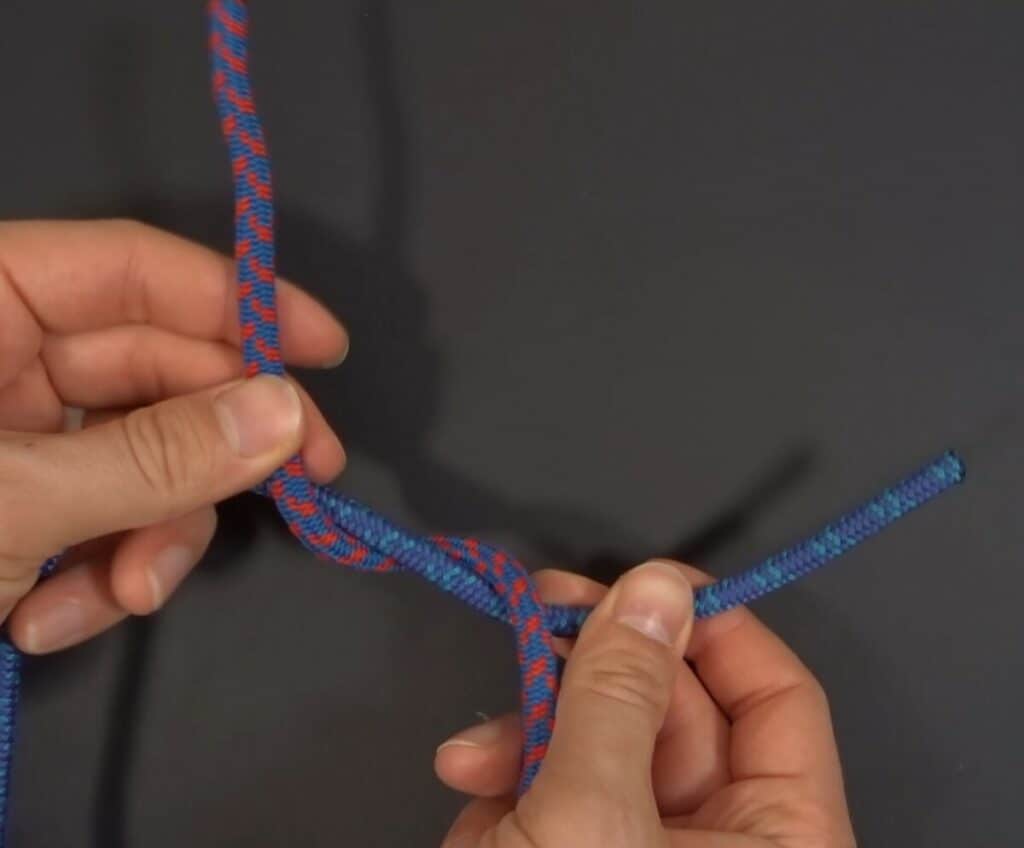
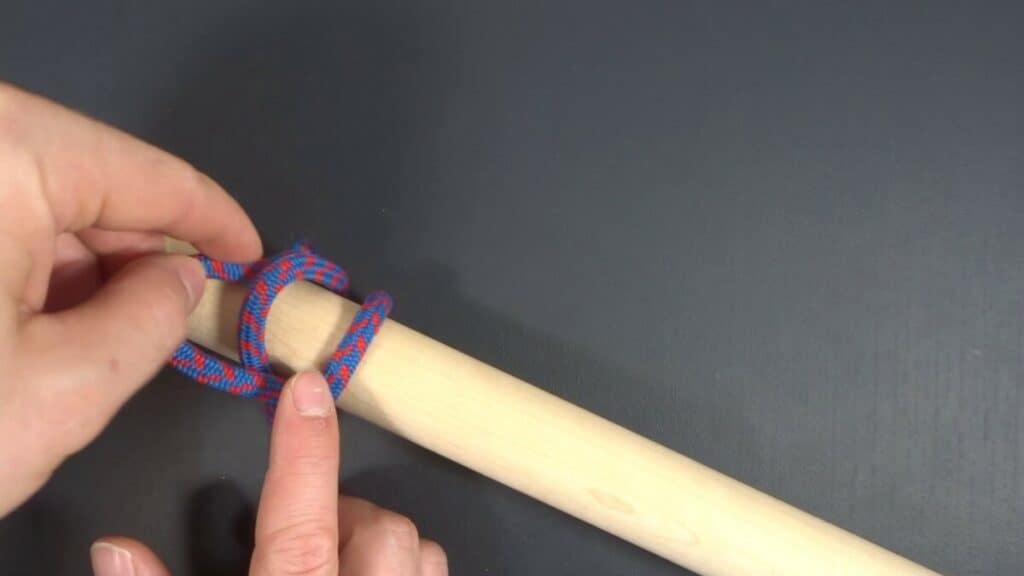
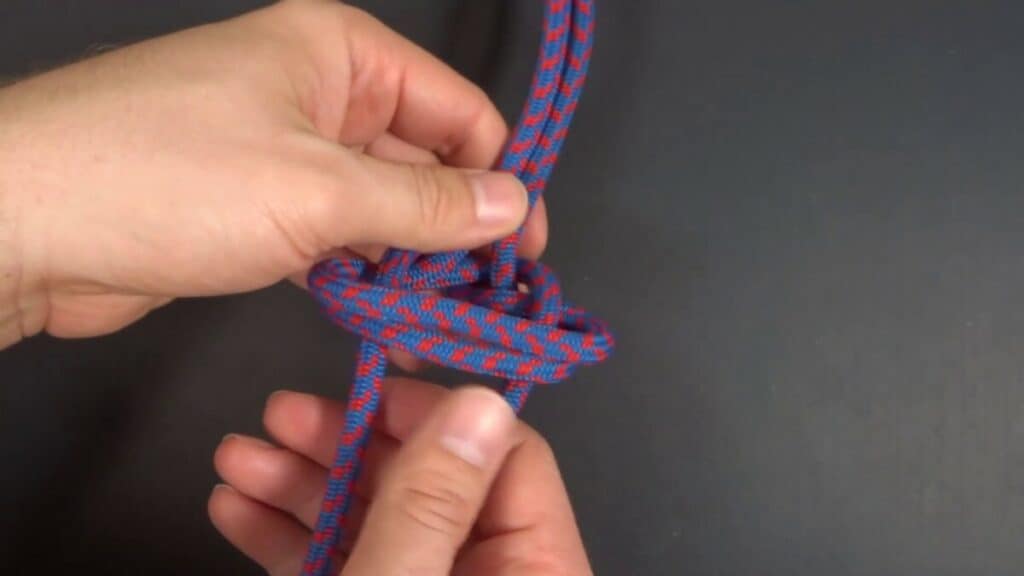
Step 1: Put the two ropes side by side. The Blue rope I’ll call Rope B, and the purple and red rope I’ll call rope A
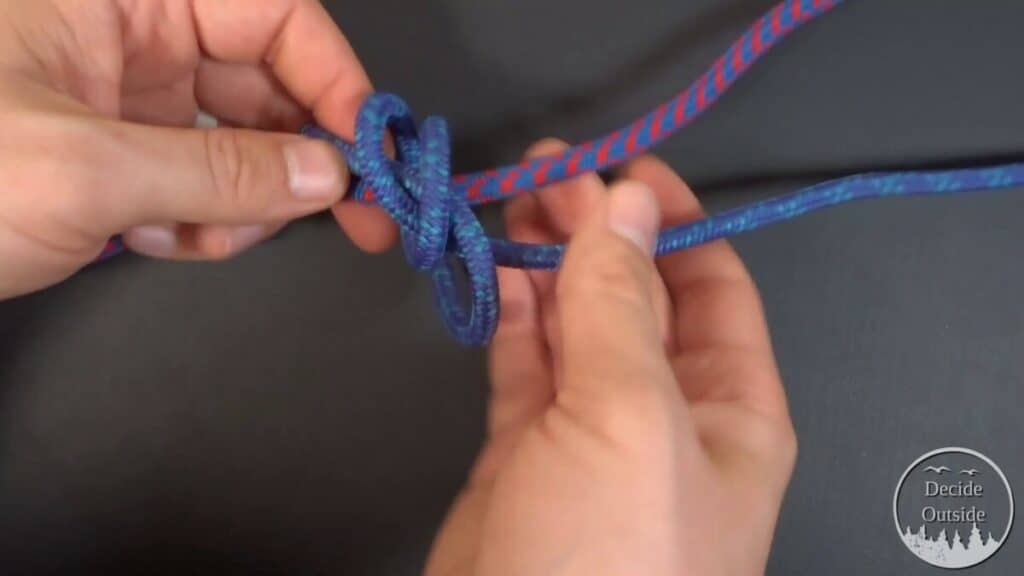
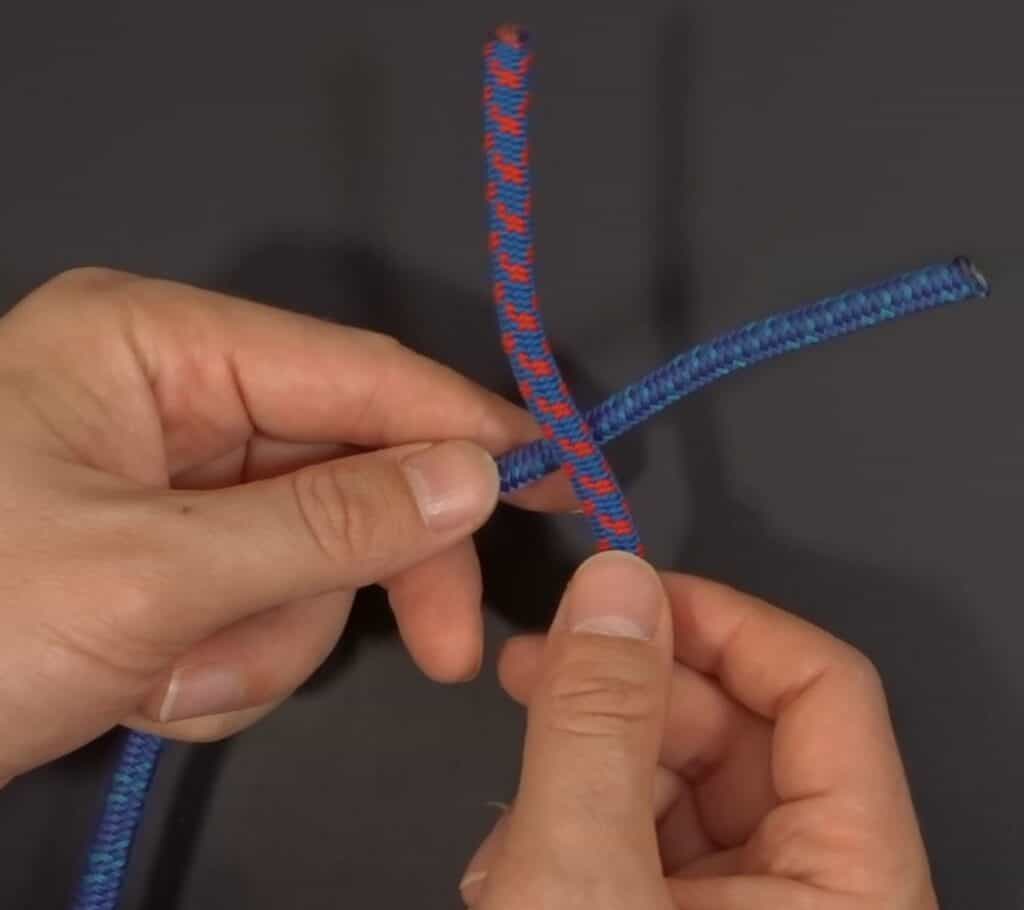
Step 2: Take Rope B and pass it over and under rope A and also underneath itself
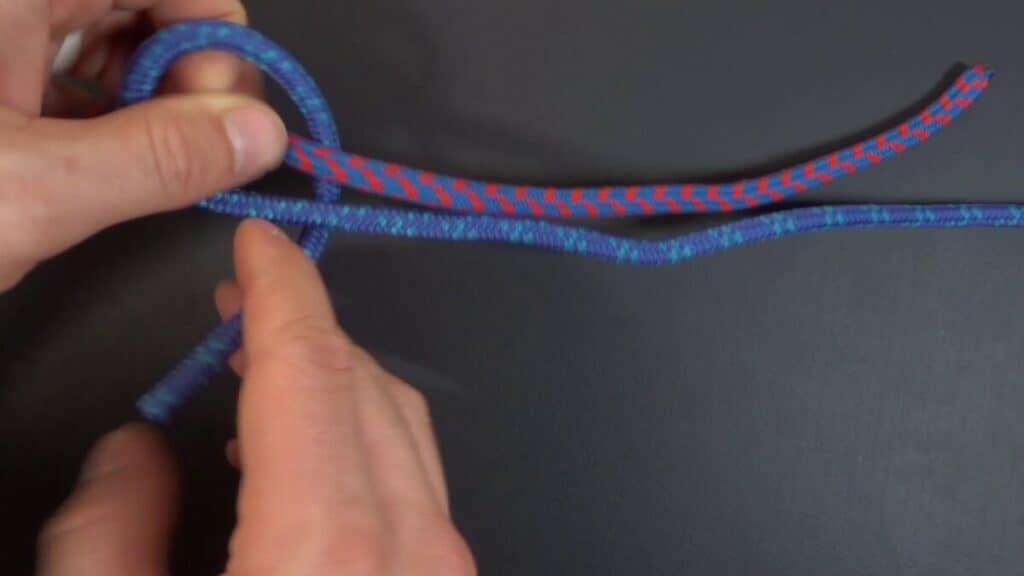
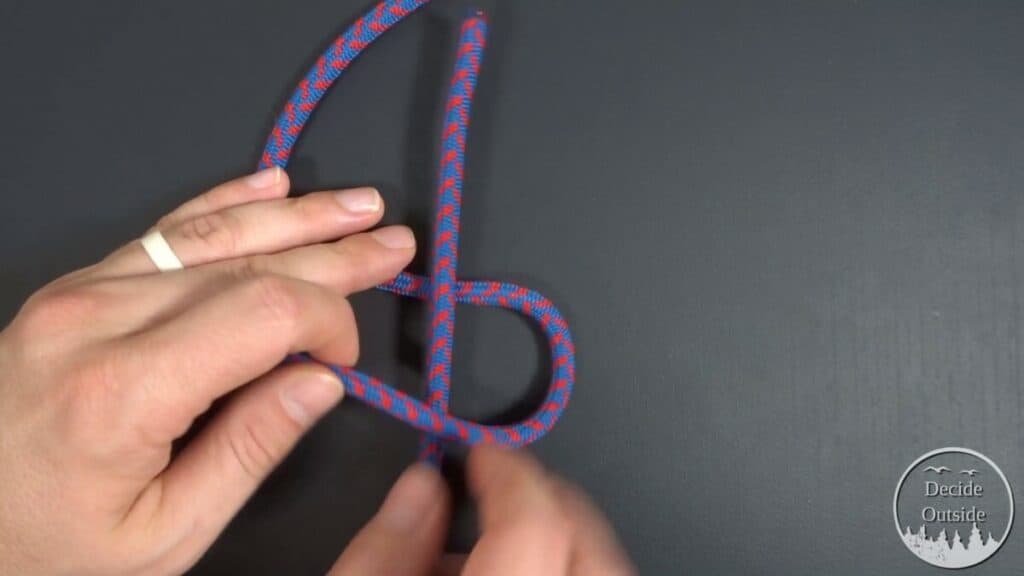
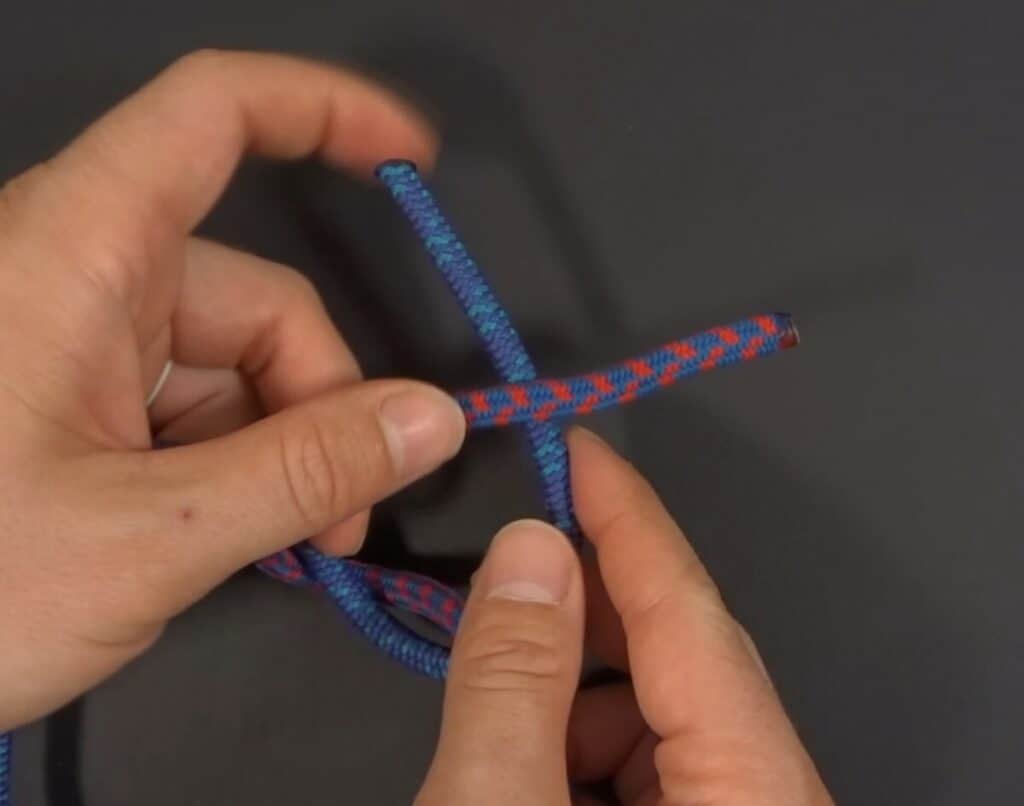
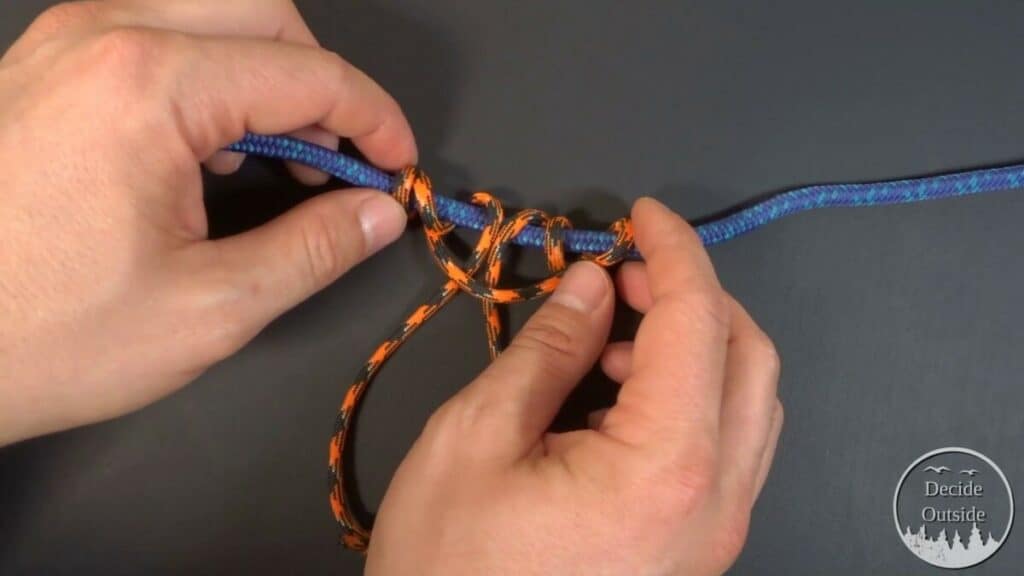
Step 3: take Rope B and Cross over Rope A once again, making sure Rope B crosses over itself, forming an X.
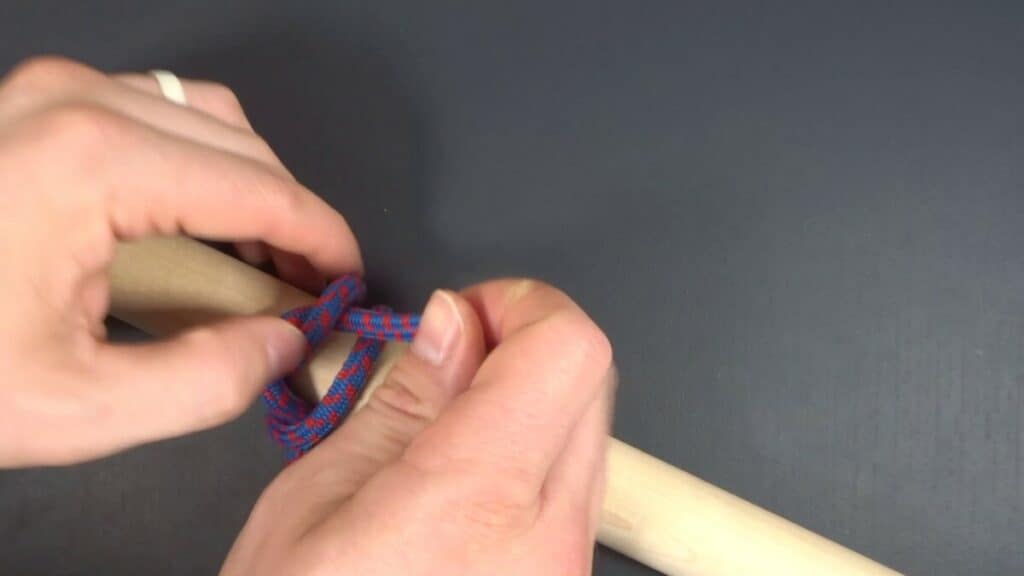
Step 4: Take Rope B and pass through both of the turns you’ve already created
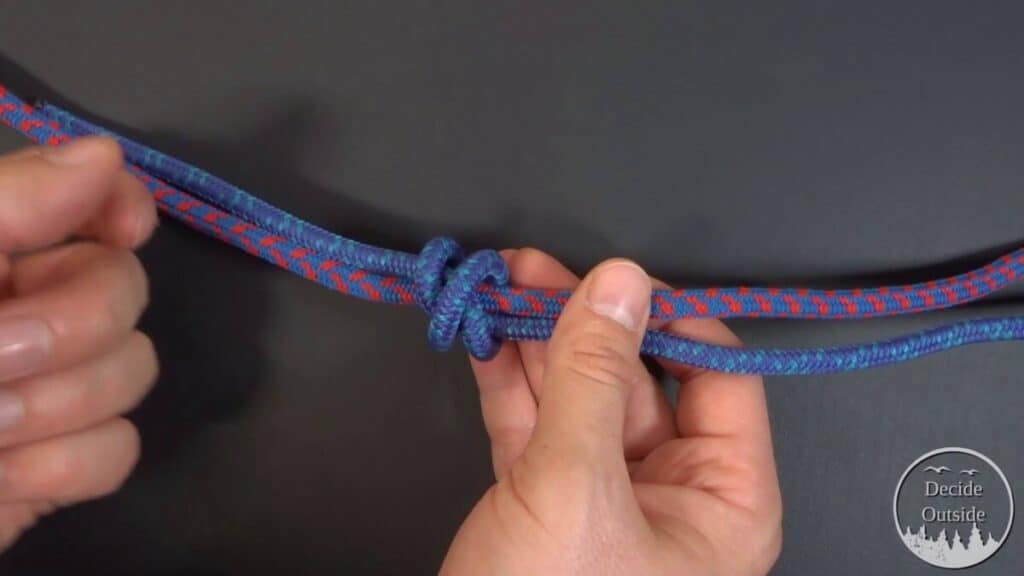
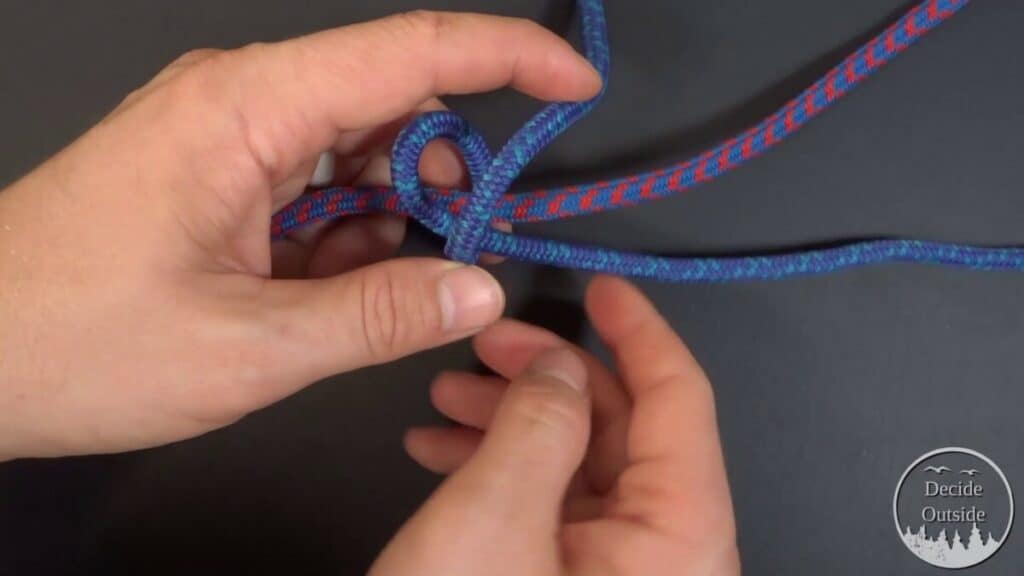
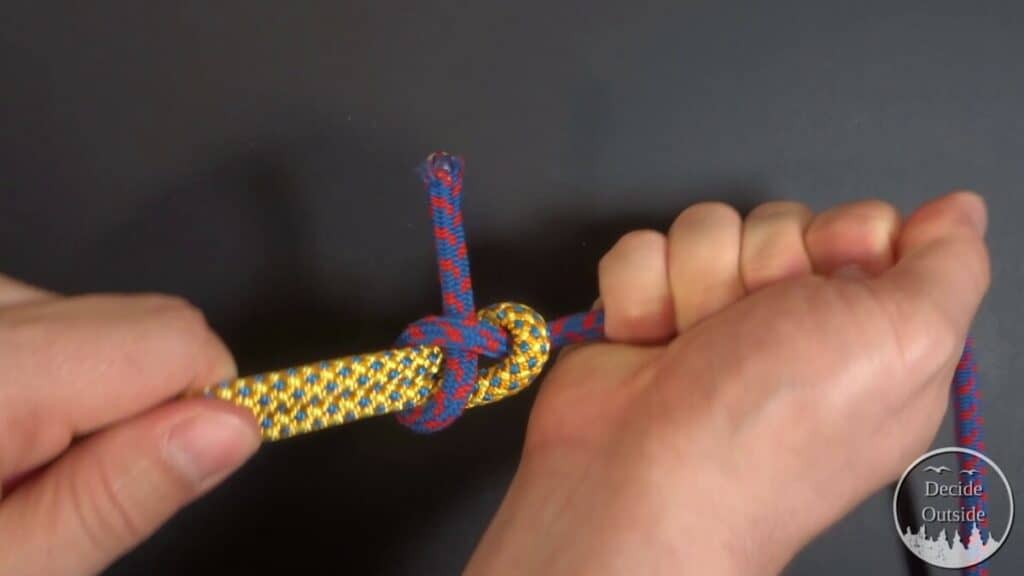
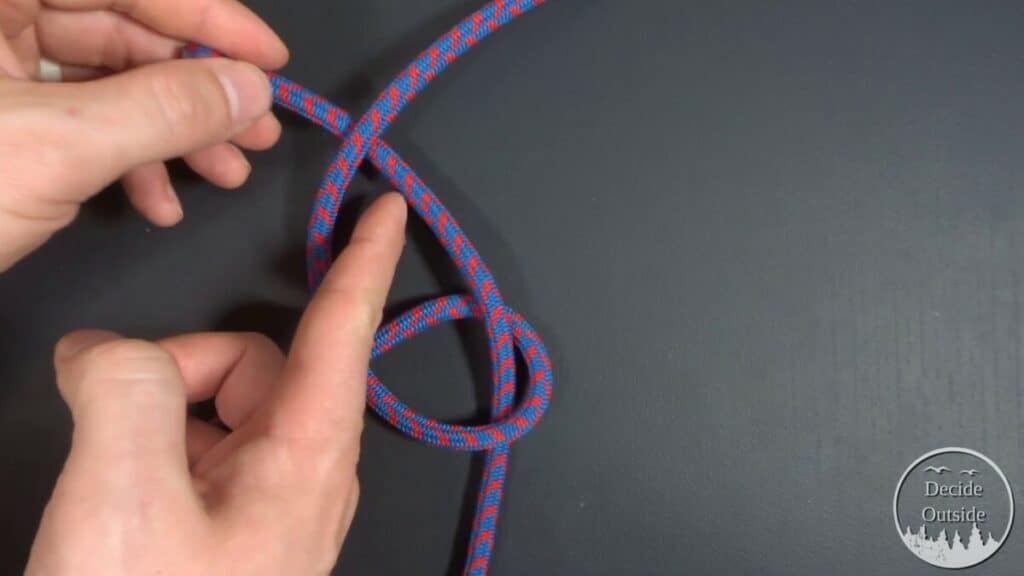
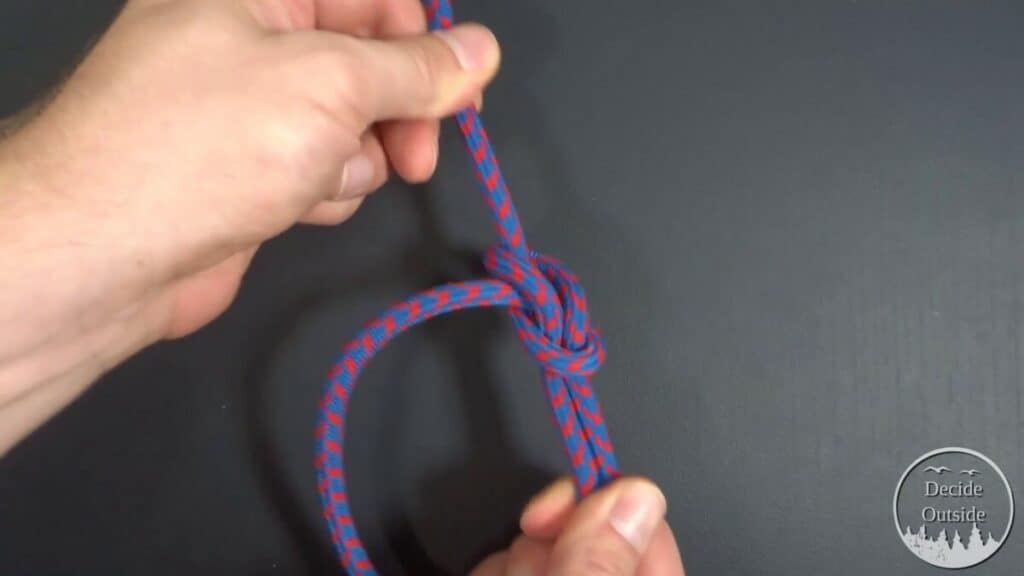
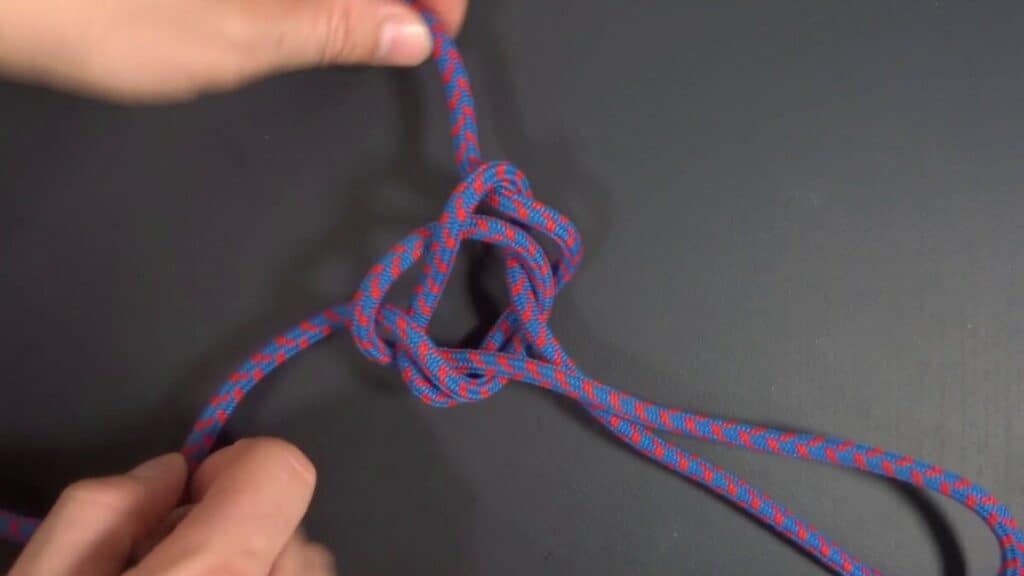
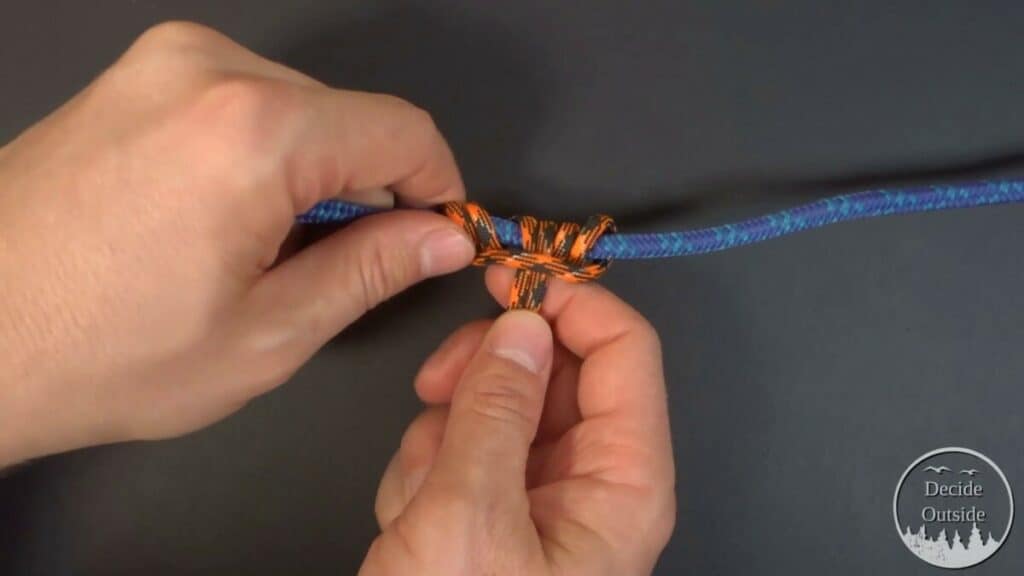
Step 5: Pull Rope B’s working end (glossary) to tighten.
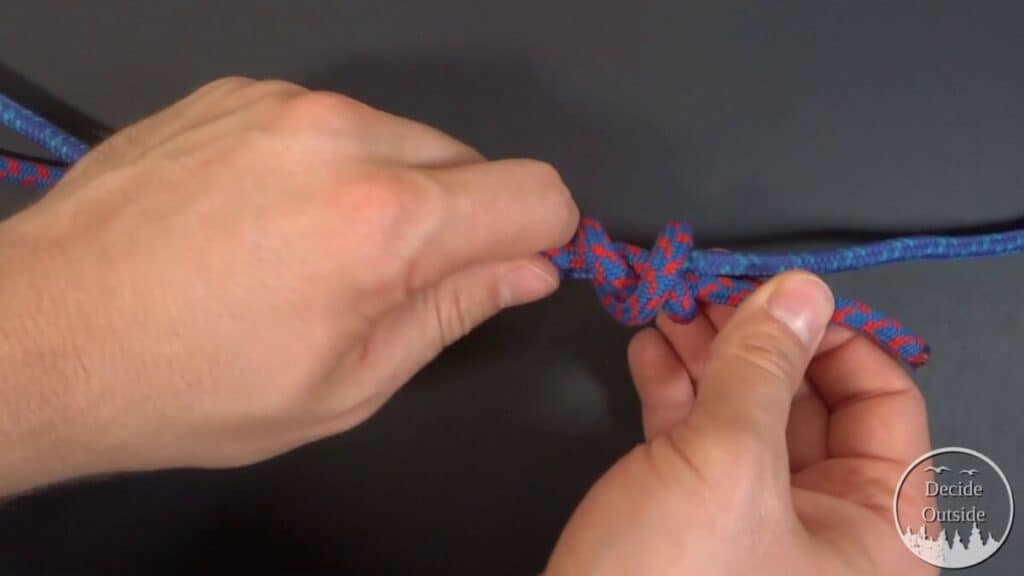
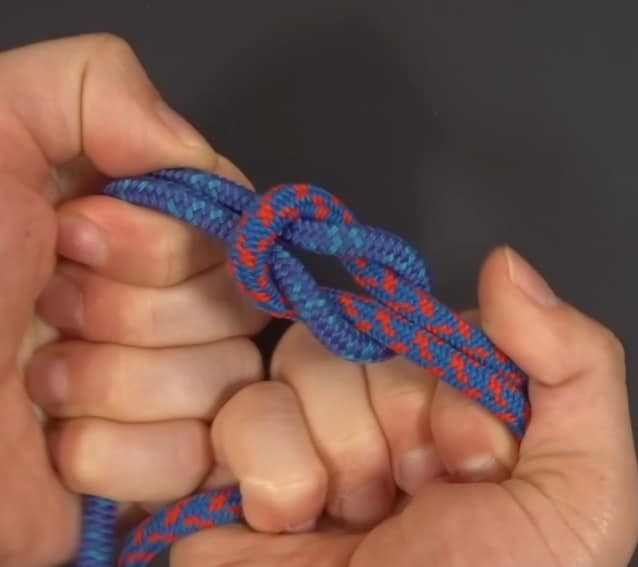
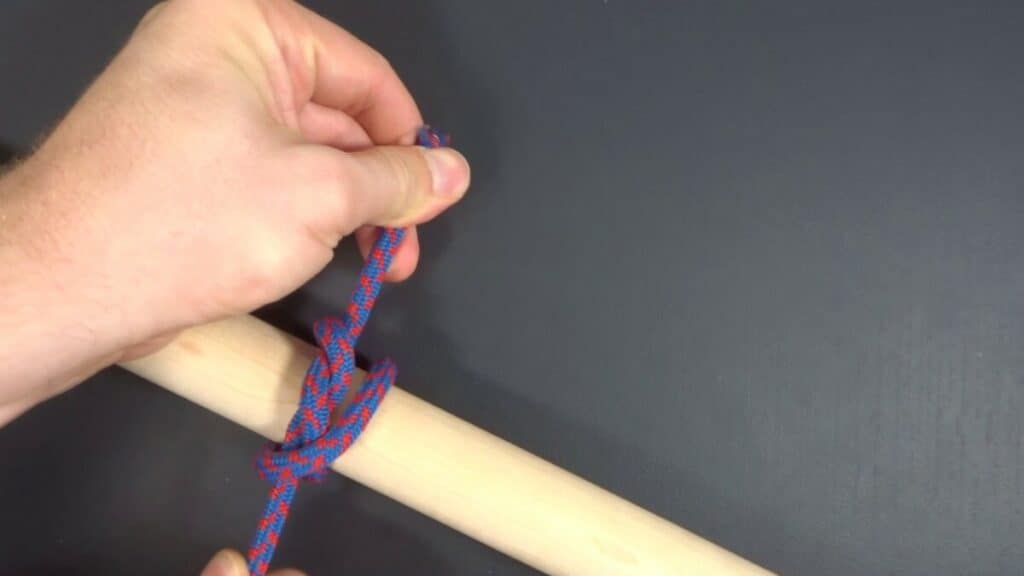
Step 6: Repeat the other side of the rope with Rope A
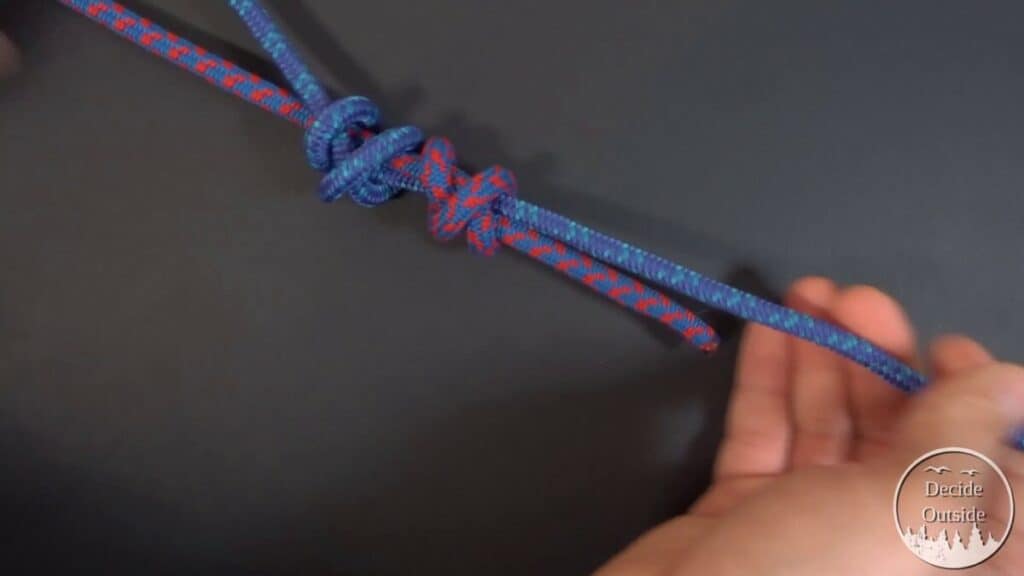
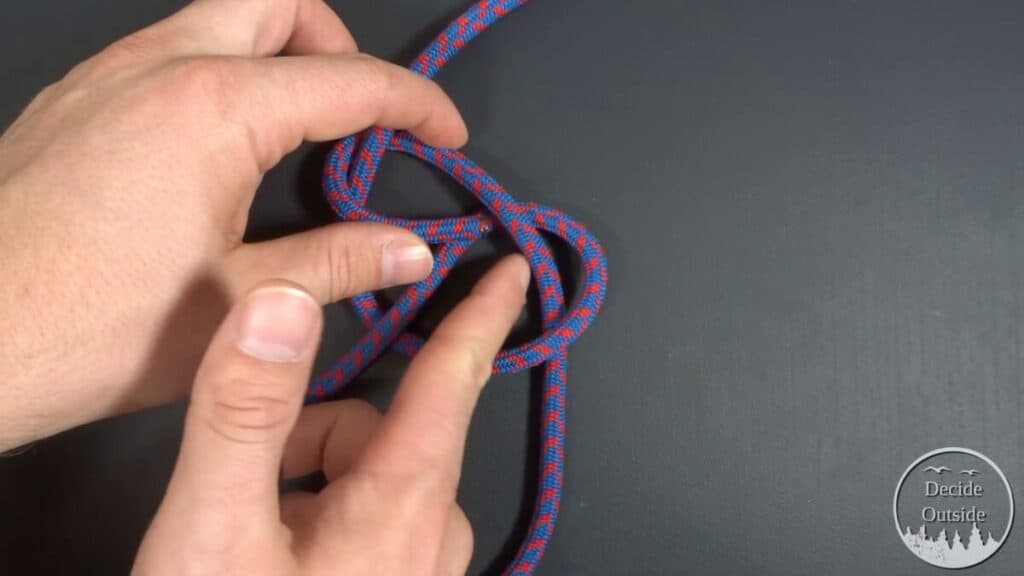
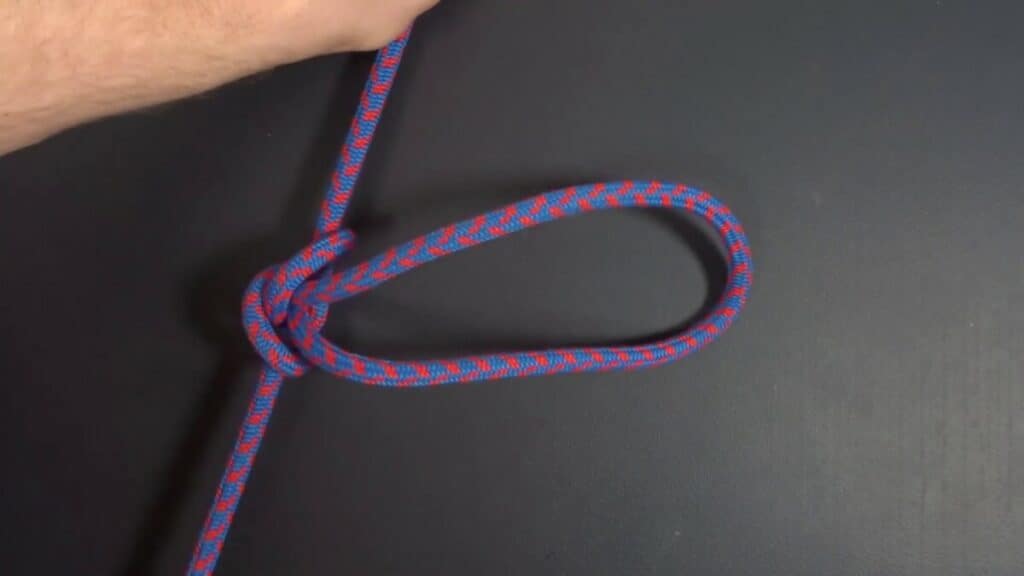
Step 7: Pull both standing parts of both ropes to snug up the tightened knots against each other
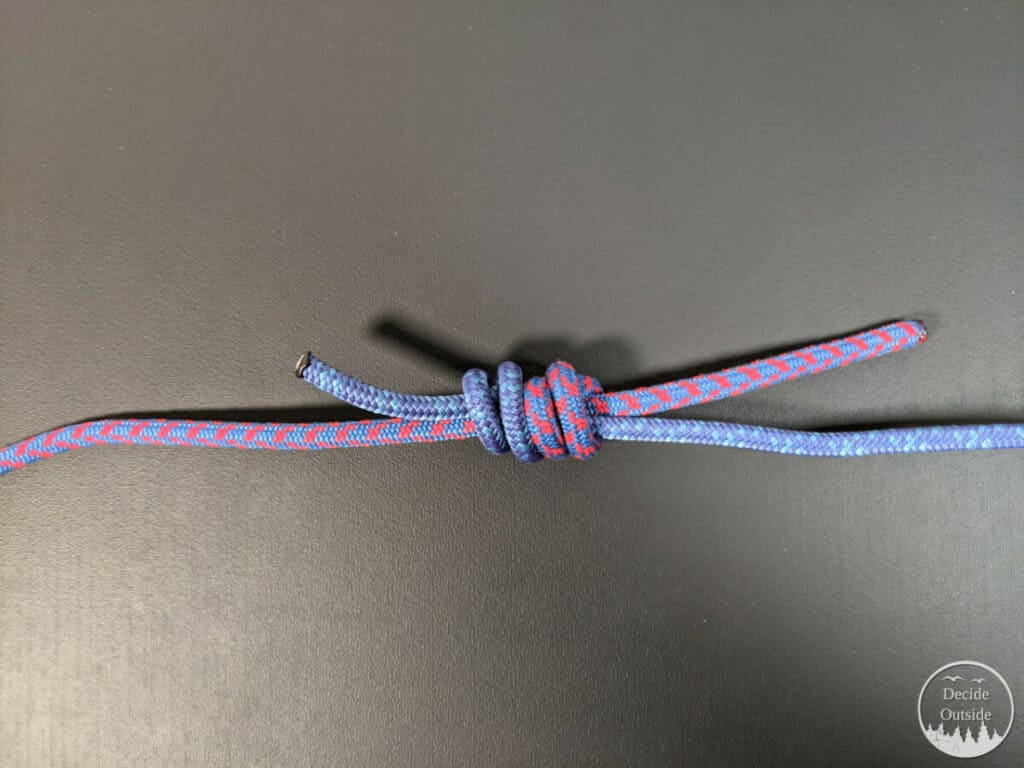
Finished
Sheet Bend
The Sheet Bend is a tremendously useful bend (a knot that ties two ropes together). By itself, it’s not particularly secure or strong, but if it’s doubled, it is more secure.
The Sheet Bend made it onto this list because of its superpower: the sheet bend is adept at tying ropes of different diameters together.
Another reason why I think the Sheet Bend is worth knowing is that it’s extremely simple. It’s a bight with a half hitch, essentially. Simple to tie means easy to remember.
Where a Sheet Bend Can Be Used
- Anywhere you need to tie two ropes together
- The Sheet Bend is very easy to tie into a bight (glossary) in the middle of the line, not just at the end.
- Anytime you are tying a smaller-diameter rope to a larger-diameter rope. I use this technique when I’m using a pull rope. If I’m running cable or towing a cable in any way, I can use a tow rope that’s much smaller to pull the rope along and the sheet bend makes this very easy.
How To Tie the Sheet Bend Video Instructions
How To Tie The Sheet Bend Picture Instructions
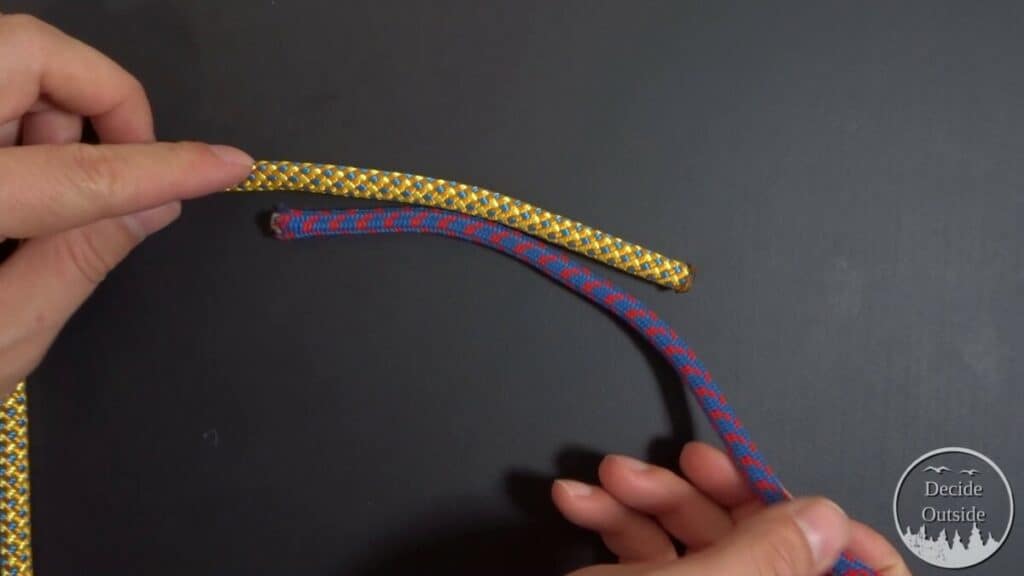
Step 1: Pick the larger diameter rope to be the left rope (Rope A) and the smaller diameter rope to be on the right (Rope B) Also, if they are the same diameter, it doesn’t matter.
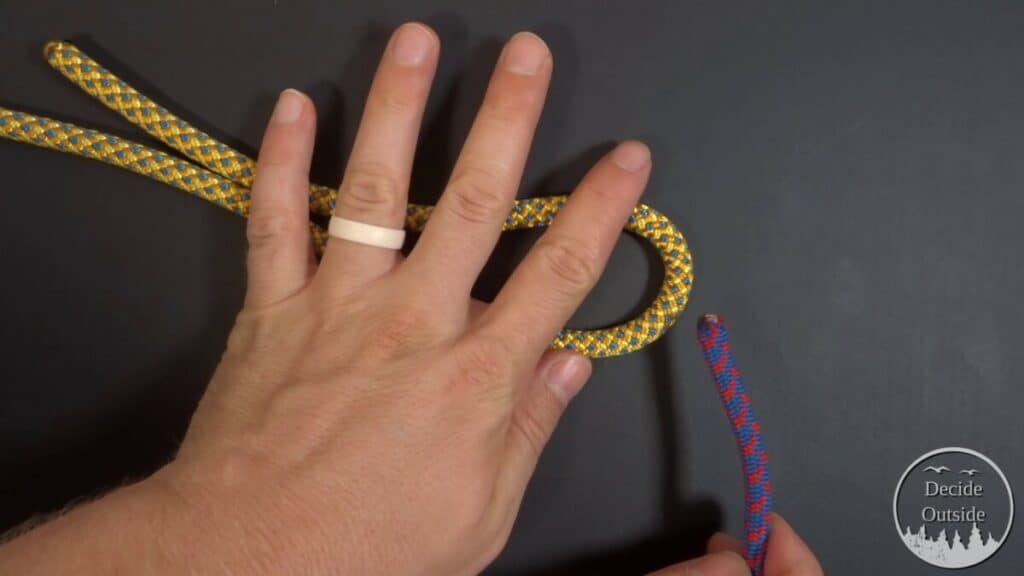
Step 2: Form a bight with the rope on the left (rope a).
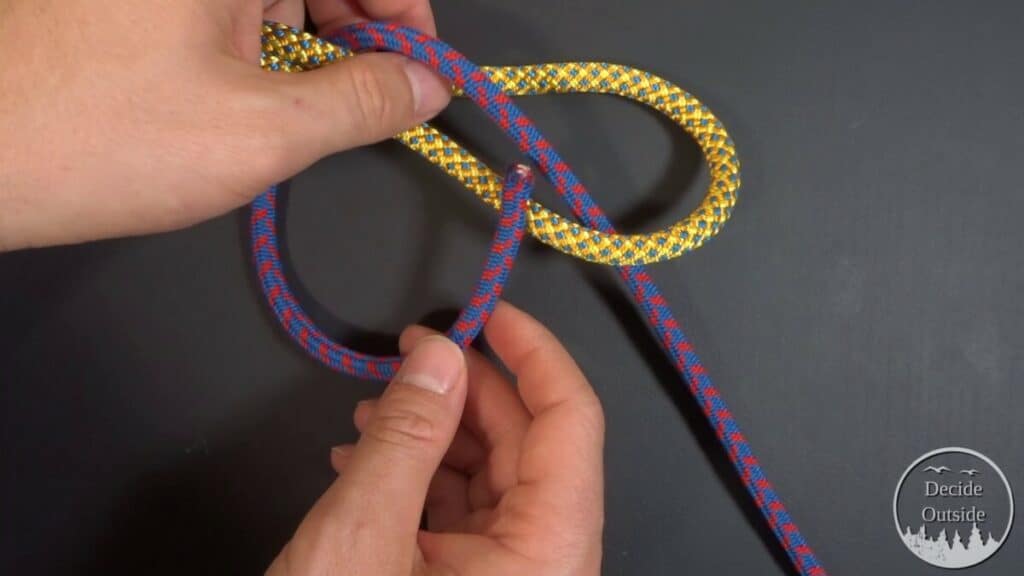
Step 3: Take the rope on the right (rope B), and pass it through the underside of the bight and pass it over the top of the bight and then under both two lines in rope A in the bight.
Step 4: Pass Rope B underneath itself, but OVER the top of the bight in rope A, forming a half hitch.
Step 5: Pull both ends of the bight on rope A and Rope B in opposite directions to tighten

Doubling the Sheet Bend
In Step 4, you pass rope B underneath itself to form a half hitch. You can add an additional wrap around rope A and pass it through to form a round turn and a half hitch. The end result should look something like this:
Bowline
The Bowline is a fixed loop. Once tightened the loop doesn’t change shape.
The bowline is one of those things that you just have to learn. It’s a bit tricky, to be honest, but it’s a strong knot and it’s secure.
Where to Use The Bowline
- If you need to tie a rope around a tree or other large object, you can tie a loop in the end and feed the rope through to form a girth hitch
- An emergency chair or step: The bowline can be tied with one hand and in an emergency, you can fix a loop around yourself to form a chair or a step.
- If you want an anchor point for a carabiner, a fixed loop with a bowline will do you just fine.
How To Tie The Bowline Video Instructions
How To Tie The Bowline Picture Instructions
Step 1: Make a bight at the end of the rope, with the standing part on the left and the working end on the right (glossary for terms)
Step 2: Make another bight in the standing part towards the working end
Step 3: Cross the bight you just made away towards the standing part
Step 4: Take the working end and put it through the bottom of the crossed bight
Step 5: Take the working end and put it behind the standing part
Step 6: Take the working end around the standing part and put it back through the bight keeping the working end parallel to the working end
Step 7: Pull the working end through
Finished bowline
Square Knot
The square knot is a binding knot (glossary).
The square knot is an indispensable knot. It’s an easy knot, it’s an important knot. You can also use a square knot in situations where it will work temporarily while you find better solutions.
You should knot the square knot backwards and forwards as a fallback knot–and there are also other uses for the square knot that you should understand. Learn the things you can do with a square knot, here in our other article.
Where a Square Knot Can Be Used
(these come from our other article, here)
- Tying Your Shoes
- Securing a Bundle
- Securing long thin bundles (think shovels, paddles, garden tools, etc)
- Finishers to several different types of knots
How To Tie the Square Knot Video Instructions
How To Tie The Square Knot Picture Instructions:
Step 1: Take two ends of a rope and put them parallel (my pictures show two different ropes to make it easy to follow)
Step 2: Place the right end of the rope over the left end of the rope, forming an X
Step 3: Wrap the right end (which is now the left end) of the rope over and around the left end of the rope
Step 4: Place the left end of the rope over the right end of the rope forming another X

Step 5: Wrap the right end (now the left end) of the rope over and under the left (now the right) end of the rope
Step 6: Pull the knot tight by pulling the two ends as well as the 2 standing parts of the rope.
You’ll know you did this right if you have two interlocking loops with all lines parallel.
Constrictor Knot
The constrictor knot is an extremely effective binding knot.
The base of a constrictor knot is the clove hitch.
This is an absolute powerhouse of a knot. If you want to tighten something that won’t come undone (perhaps even needing to be cut), then the constrictor knot will serve you, well. Additionally, the constrictor knot is not too hard to tie. And if you know your clove hitch, it’s even easier.
To be clear, the constrictor knot isn’t perfect, and I’ve noticed for chunky rectangular objects it’s not as effective.
Where a Constrictor Knot Can Be Used
- Securing a bundle for shipping or transporting: If you want a bundle of whatever to not come undone no matter what, then a constrictor knot should be the first thing on your mind
- Tying a rope to a rock for throwing: In addition to a few base wraps, a constrictor knot is my favorite knot for tying a rope to a rock for throwing. Why are you tying your rope to a rock you might ask? Well, sometimes if you are trying to set up a shelter, it helps to be able to throw your rope over a branch or something similar without needing a ladder.
- Tying a hitch that you don’t want to release: If you want to tie a rope to an object and you don’t plan on untying it, then a constrictor knot is not a bad option. Note that the knot can actually continue to tighten as you pull the working end and standing part (rope glossary if you want to brush up on your terms).
How To Tie the Constrictor Knot Video Instructions
How To Tie the Constrictor Knot Picture Instructions
Step 1: Tie a Clove Hitch, give yourself enough slack in the working end so you can add another twist.
Step 2: Take the working end and pull it over the standing part of the clove hitch.
Step 3: Pull the working end under and through the standing part
Step 4: Pull the knot tight by pulling on opposite ends of the knot
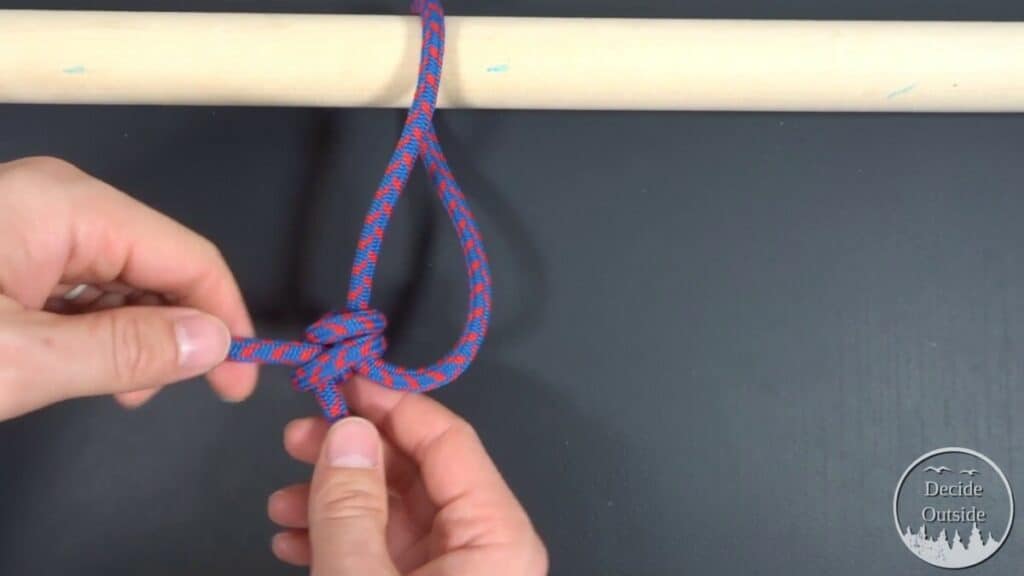
Alpine Butterfly
An Alpine Butterfly is a fixed loop that you can tie in the middle of the line.
The fact you can tie the Alpine Butterfly in the middle of the line is in fact its superpower. You can hang stuff, loop through stuff, make pulleys… etc. It’s worth knowing.
Where To Use an Alpine Butterfly
- If you want to attach a carabiner to the middle of a rope, you can use an Alpine Butterfly to make an anchor point
- You can use a fixed loop in a line as a pulley, using this to pull a rope very tightly (this puts a lot of friction on your rope, caveat emptor)
- You can use an anchor in the middle of the line as a way to make your rope rescuable. If you put another rope or the working end of a line you have hanging over a high branch, you can pull on the line going through the Alpine Butterfly as a way to retrieve the rope.
How To Tie the Alpine Butterfly Video Instructions
How To Tie The Alpine Butterfly Picture Instructions
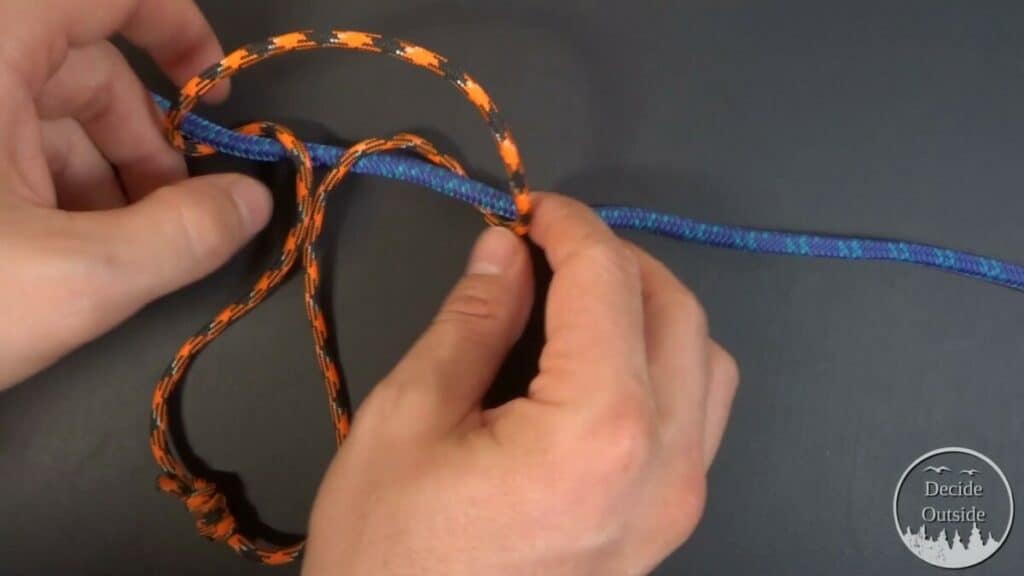
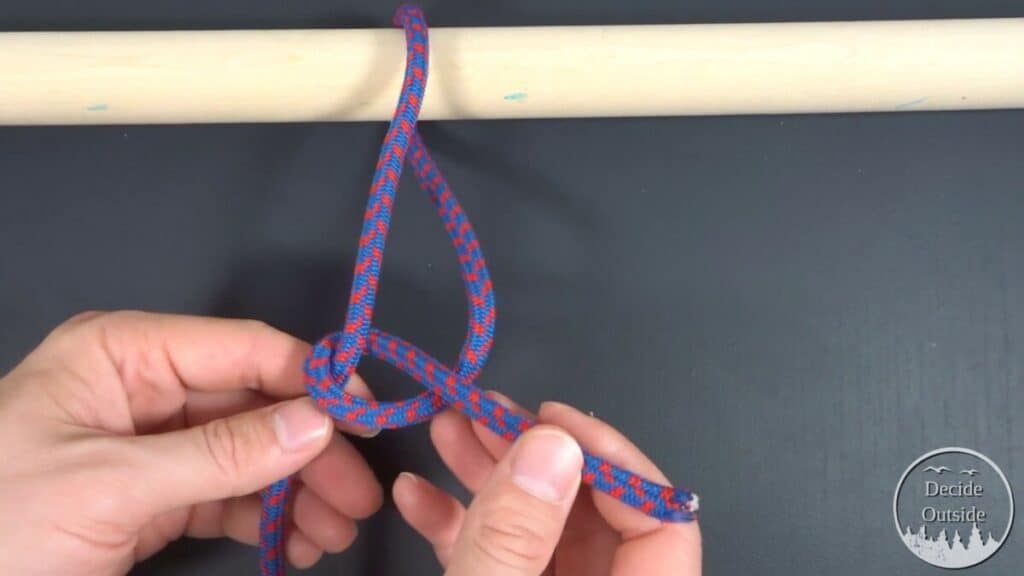
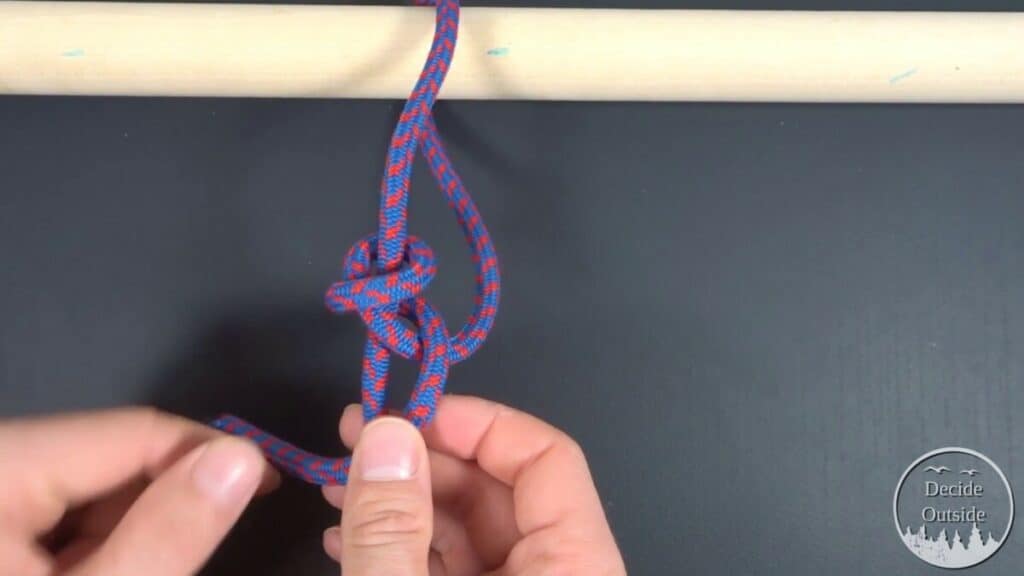
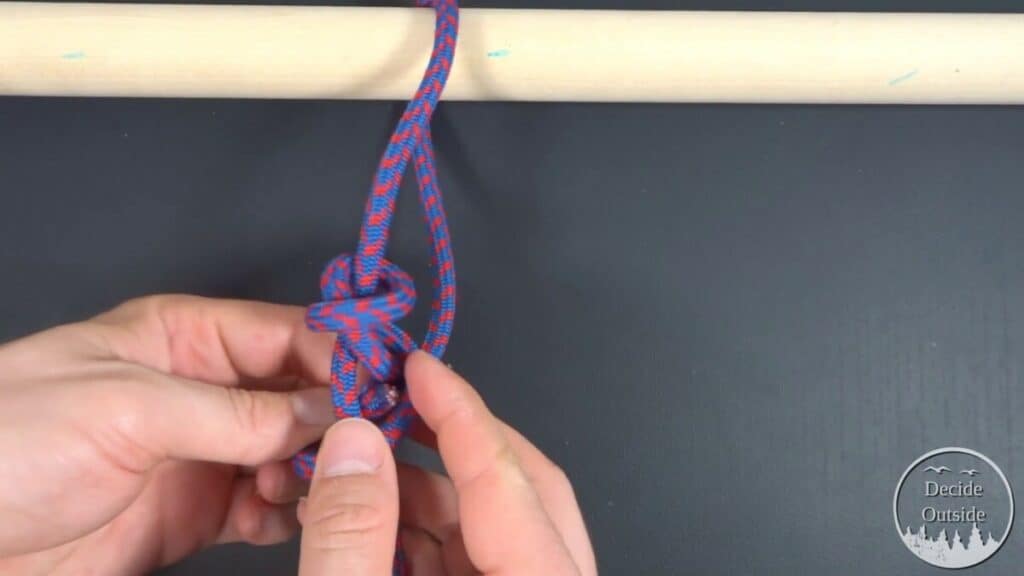
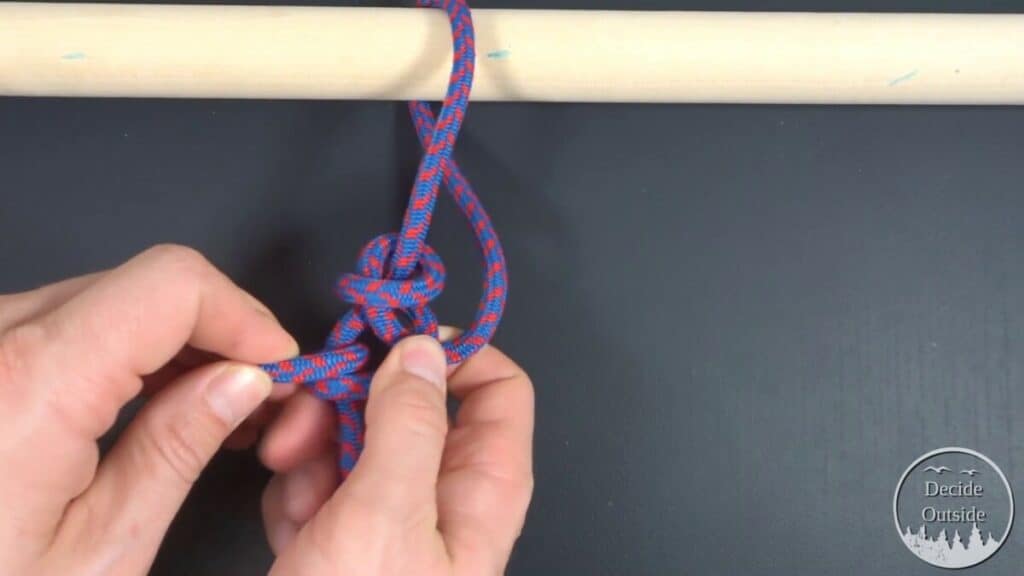
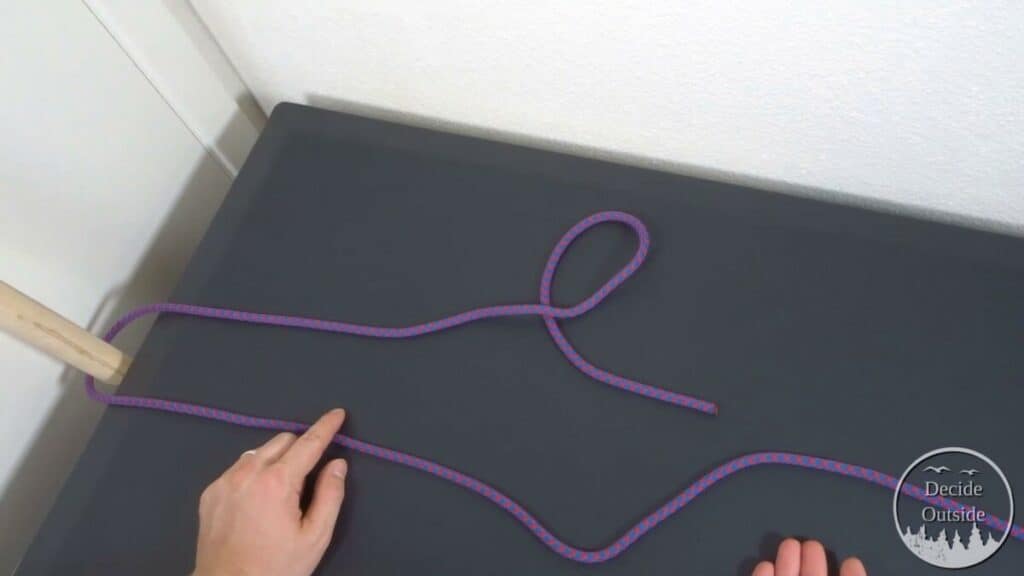
Step 1: Find a section in the middle of your rope where you want your alpine butterfly. You want to have plenty of room on both sides.

Step 2: Wrap the line (clockwise) twice around your left hand until you have 3 parallel lines in your hand.
I will call these, from left to right, Line 1, Line 2, and Line 3
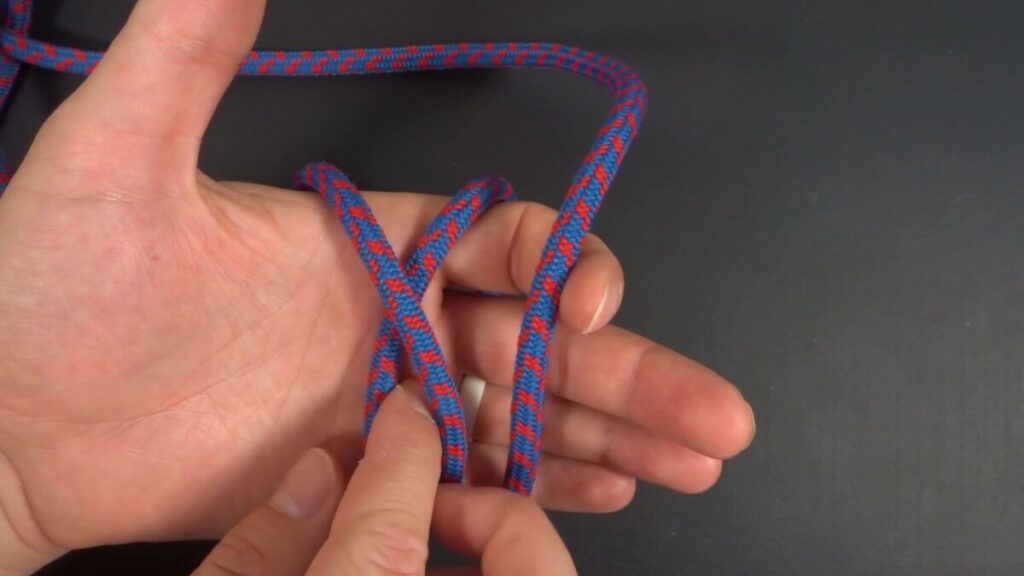
Step 3: Take the far left rope (Line 1) and bring it over the middle rope (line 2), forming an X
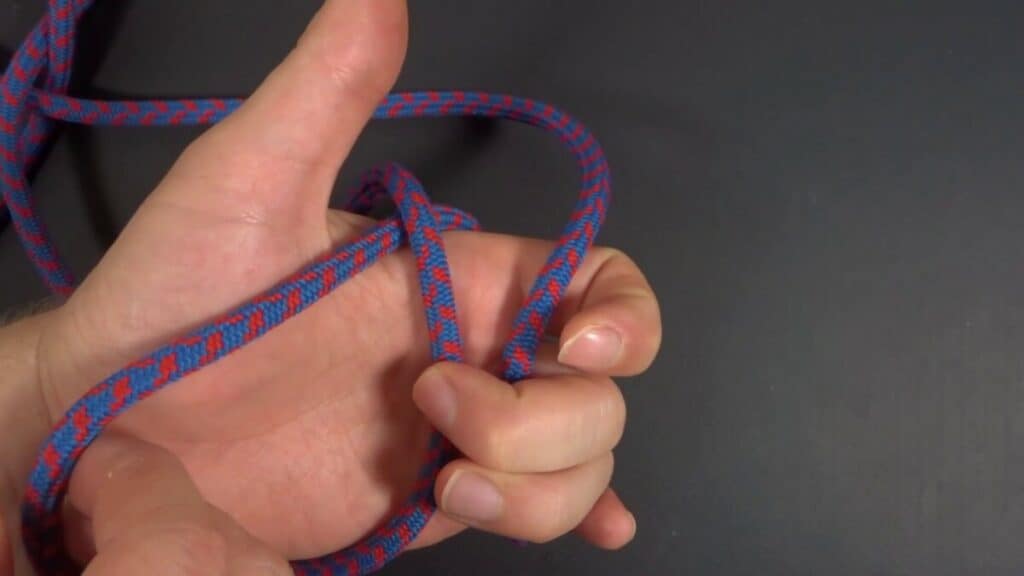
Step 4: Pull Line 2 to create slack–this will be your loop size so however big you want your loop that’s how much slack you should make
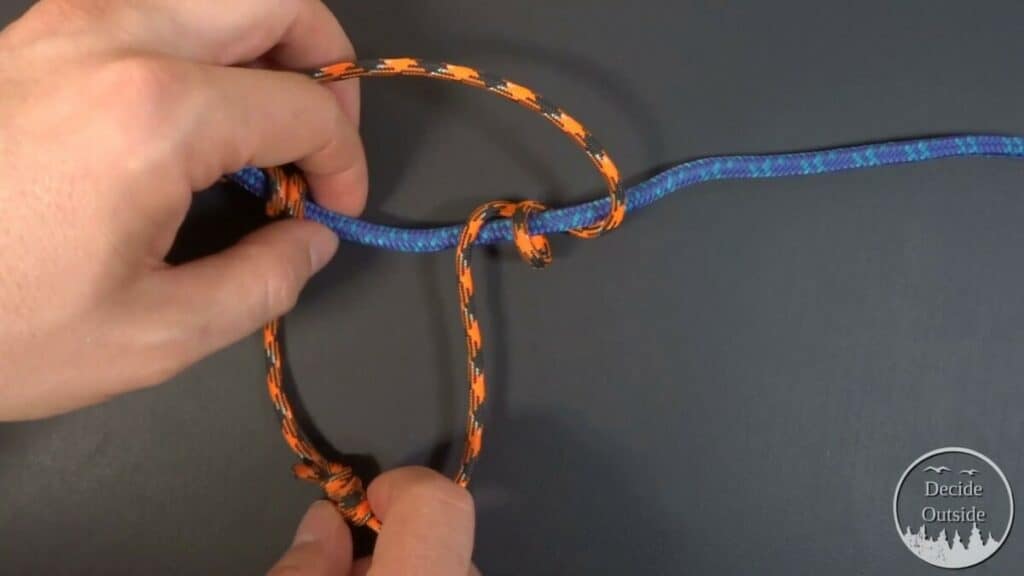
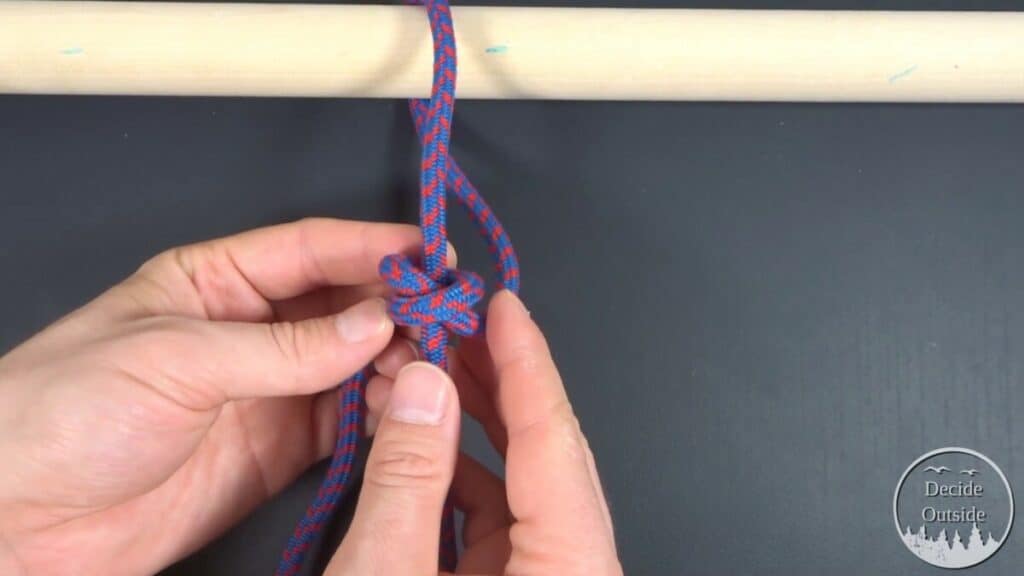
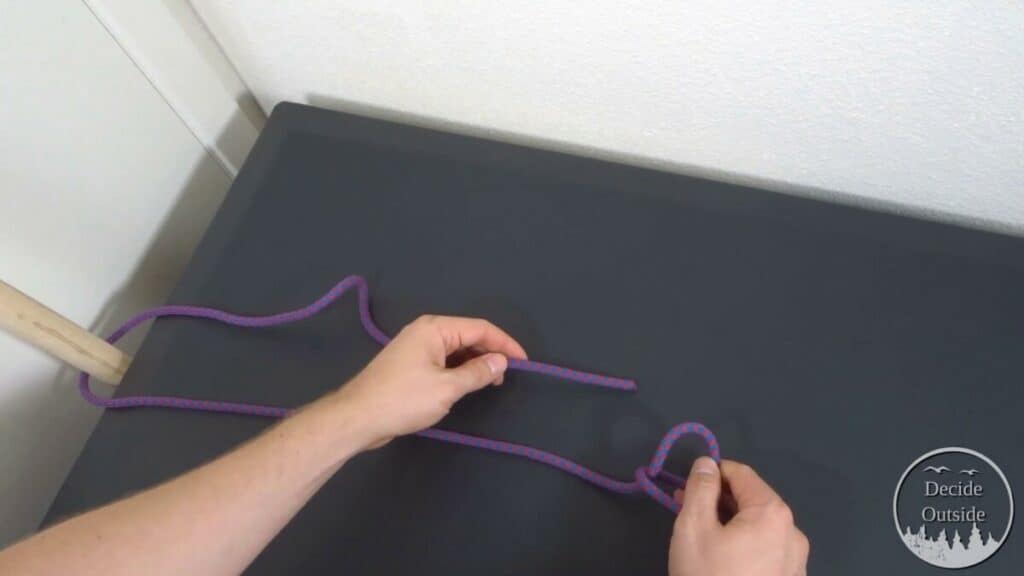
Step 5: Take Line 2 (the loop you made) and cross lines 1 and 3 all the way to the right.
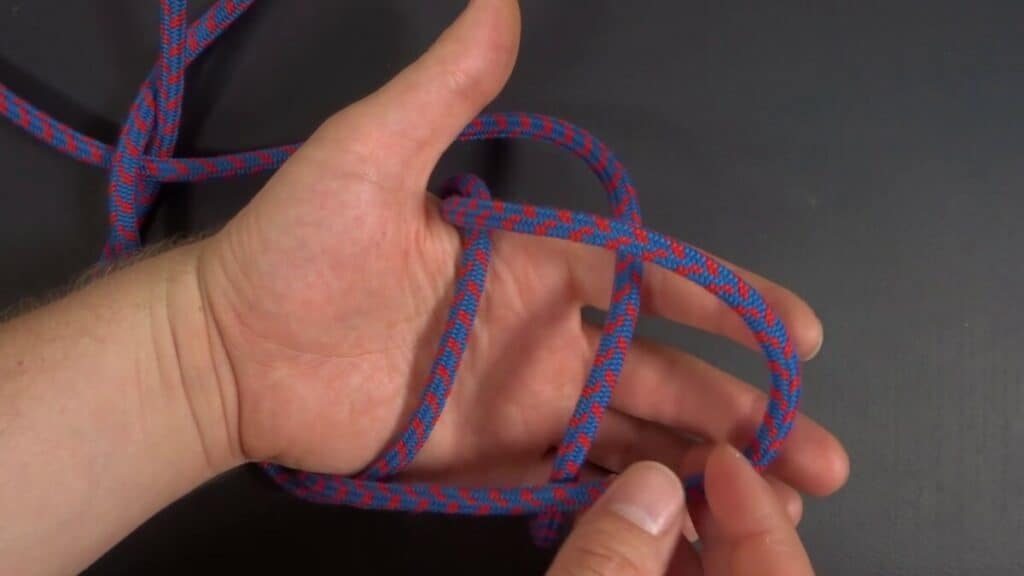
Step 6: Tuck Line 2 back underneath lines 3 and 1 (in that order).
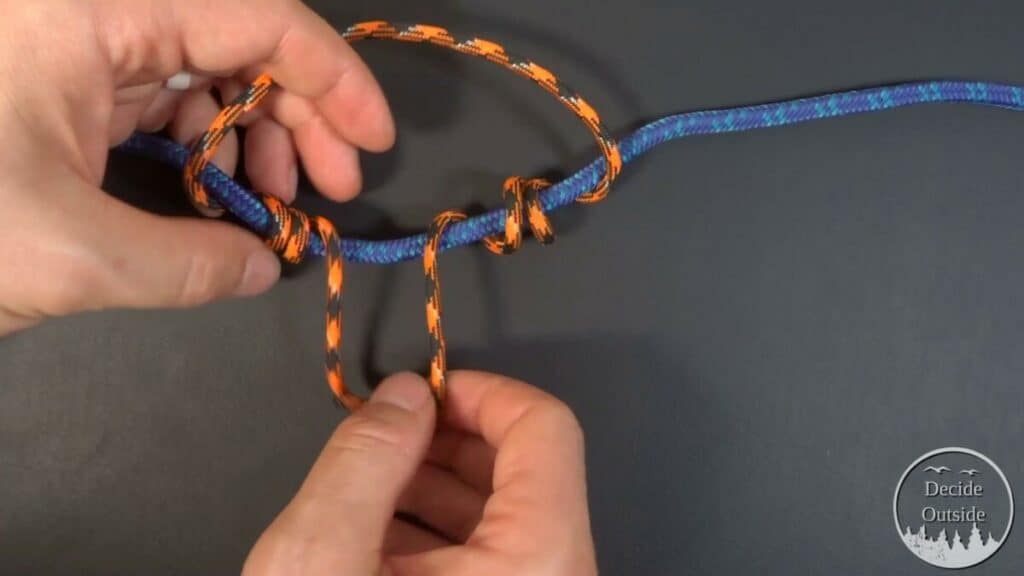
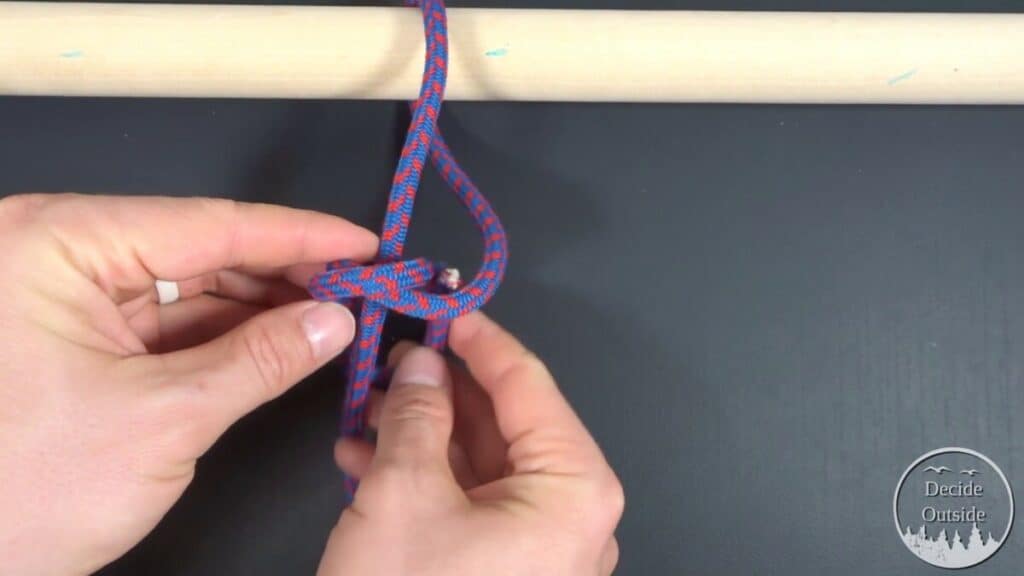
Step 7: While holding loosely onto Lines 1 and 3, pull Line 2 until the wraps of Lines 1 and 3 are just a couple inches
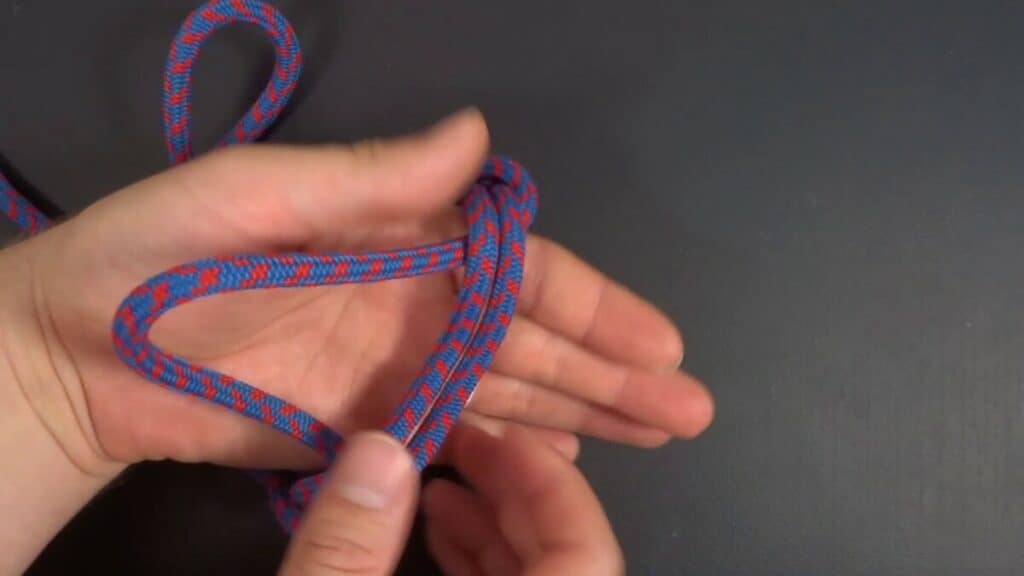
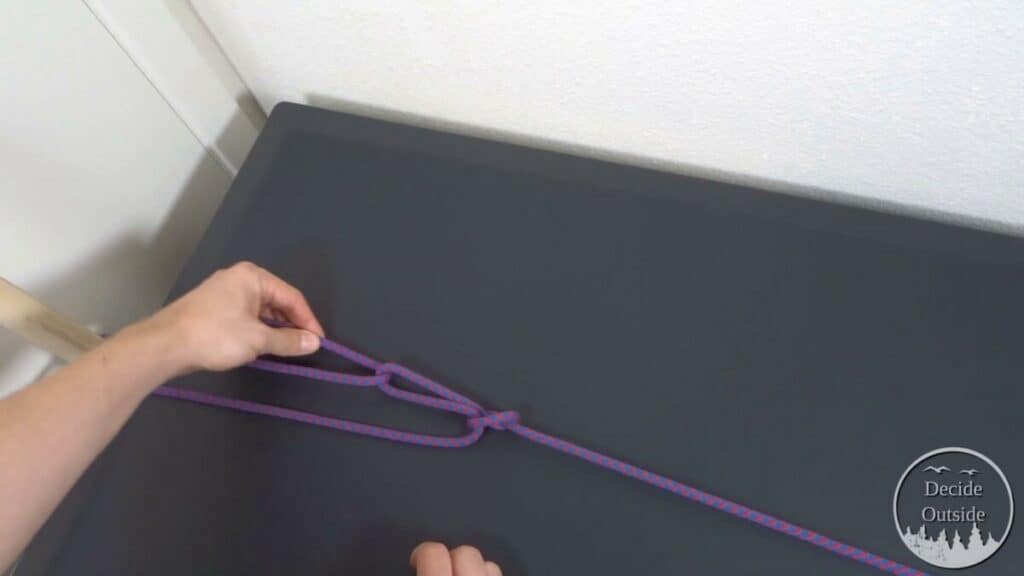
Step 8: Take the opposite working ends of the knot and pull them tight
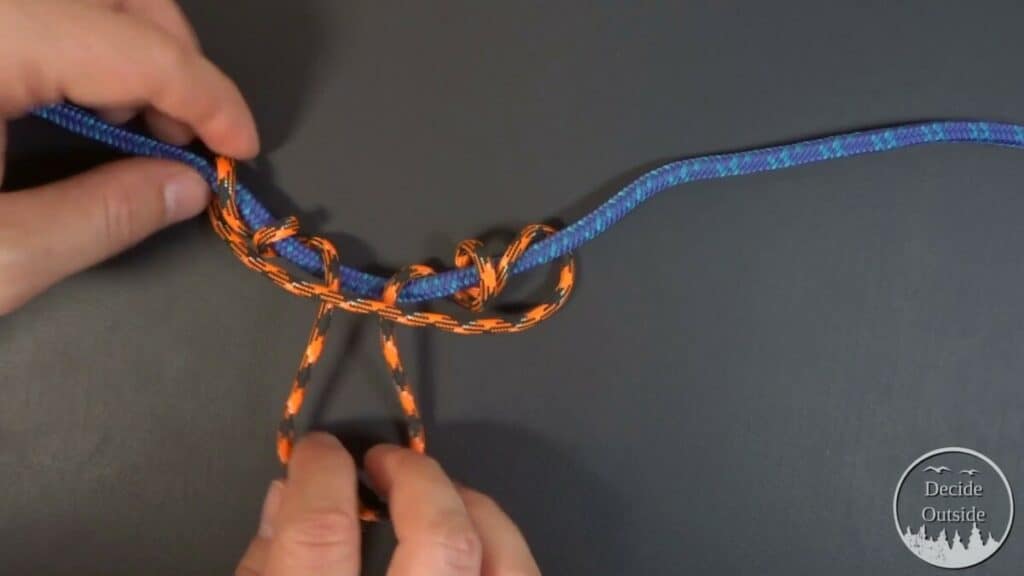
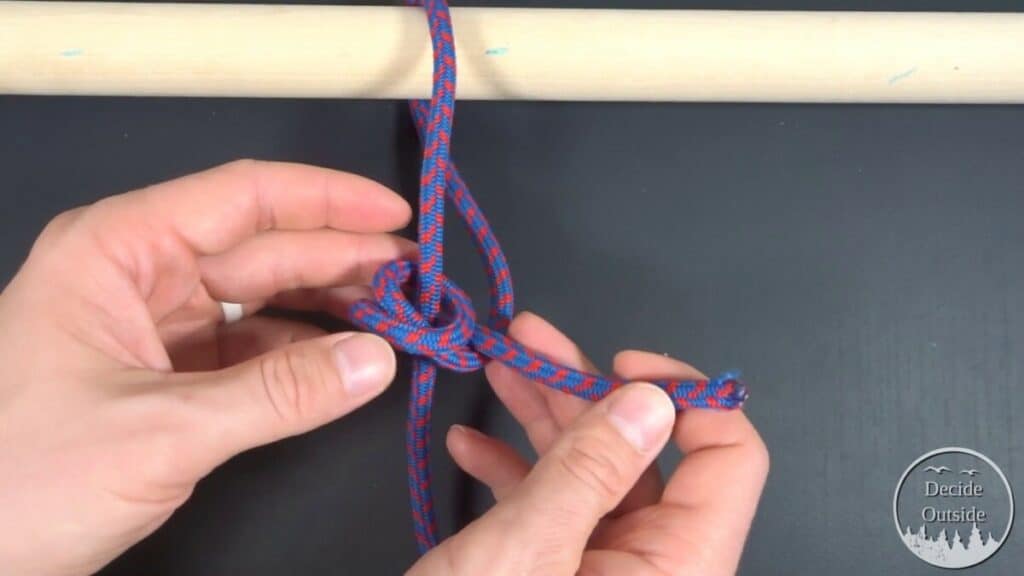
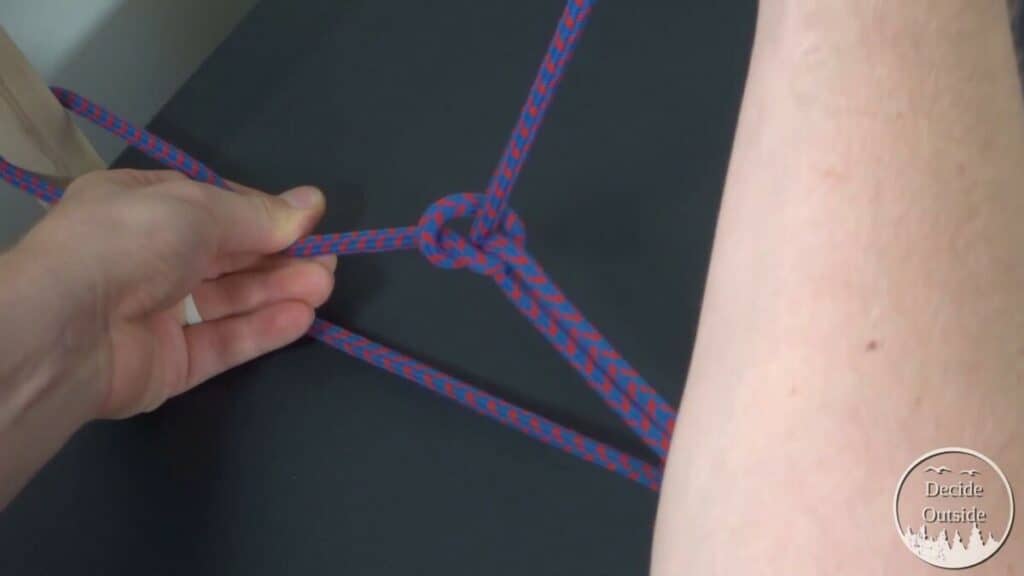
Step 9: Continue tightening until it collapses with one half hitch (glossary) on either side of the loop as you see here.
Prusik
The Prusik is a type of specialty knot called a friction hitch. It’s a rope that you tie to another rope and when pulled lateral to the rope at the end of the rope, the knot stays in place. If you pull on the knot, however, you can freely move the knot along the other rope.
That sounds complicated, and like something you’d never need, but it’s actually really useful as a way to attach moveable loops to a rope. If you want to make some loops to hang your gear along a rope or a ridgeline, then a Prusik is incredibly helpful.
Furthermore, if you ever want to attach a tarp to a rope (for making a tarp shelter), then a Prusik (or another friction hitch) is indispensable.
When To Use the Prusik
- Can be used as a moving foothold for ascending with a rope (climbers will hook their foot in a friction hitch and then raise it as they climb)
- Can be used as gear loops that you can use to attach your gear to a ridgeline
- Can be used as a way to attach your tarp to a rope along with a toggle.
How To Tie the Prusik Knot Video Instructions
How To Tie the Prusik Knot Picture Instructions
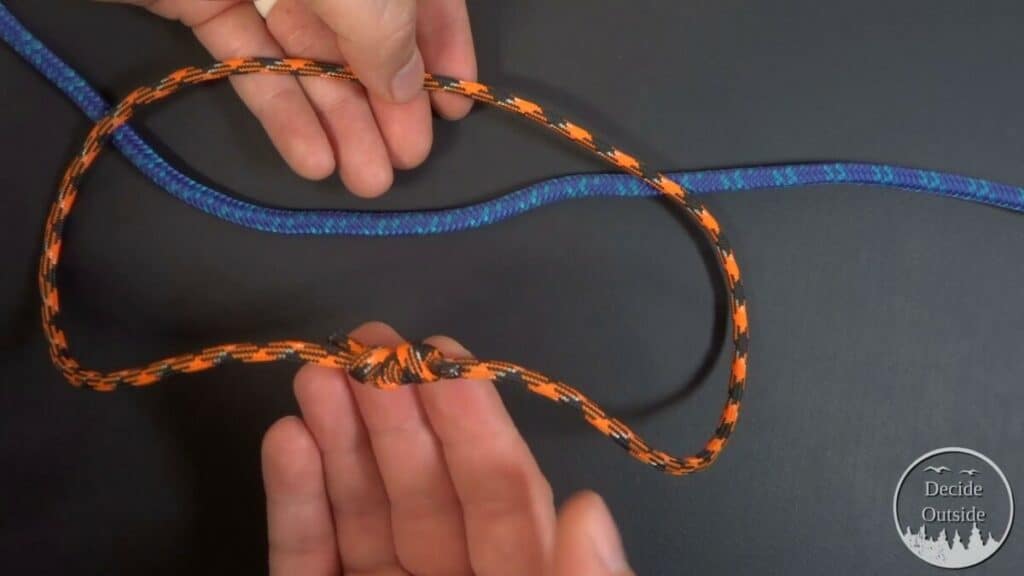
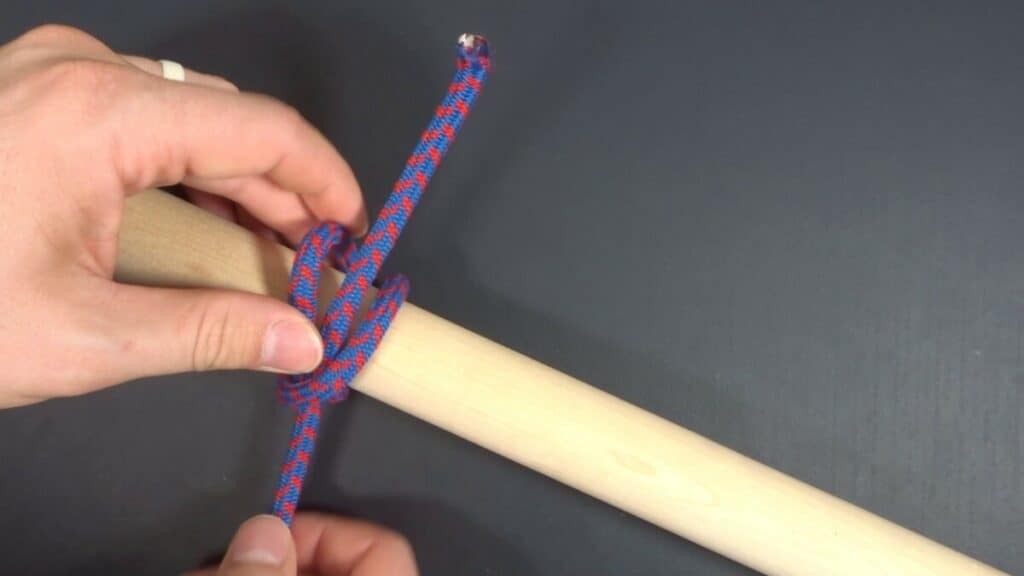
Step 1: Use a loop of rope (sometimes called a sling) tied in a strong bend (such as the double fisherman’s knot). and place it with the knot side down over the rope you want to tie the Prusik to (I’ll call it Rope A in this example).
Step 2: Take the knot of the sling and take it behind Rope A and bring it over
Step 3: Take the knot of the sling and wrap it in the same direction around Rope A while keeping the top of the sling in the same place with the other hand.
Step 4: Wrap the sling one more time around Rope A
Step 5: While keeping the ropes all arranged parallel without letting the ropes cross, Begin to pull the bottom of the sling. The top of the sling should come down in a kind of smile formation.
Step 6: Continue to pull the knot end of the sling to tighten while keeping all the lines parallel. I admit that this knot is a bit fiddley, and you have to mess around with it to get it right.
Step 7: Continue pulling the knot end of the sling until all the slack is gone from the top of the sling.
Taut-line Hitch
The Taut-line Hitch is a simple tensioner that’s a bit more secure than the “round turn and two half hitches”.
If you ever want to tighten a rope and for it to maintain the tension, then the taut-line hitch will come in handy.
It’s not meant for very heavy loads as it will slip, but for non-critical applications, it’s super useful.
When To Use the Taut-line Hitch
- Perfect clothesline knot. I love using it if I want to hang up something off the ground. We used this for our clothesline for our house and it held for years
- Need to make a rope obstacle course? Great way to make some taut ropes
- Can be used to secure a bulky load (careful with this… if it’s something heavy that will be putting a lot of strain on the rope you should do the trucker’s hitch)
How To Tie the Taut-line Hitch Video Instructions
How To Tie the Taut-line Hitch Picture Instructions
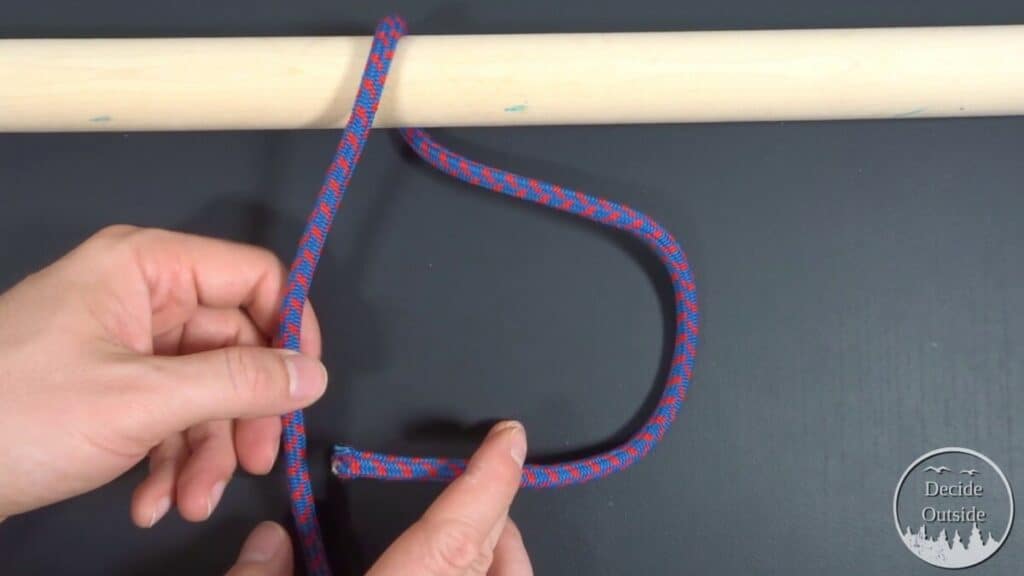
Step 1: Wrap your rope around an object clockwise so that the working end is in your right hand and the standing part is in your left hand
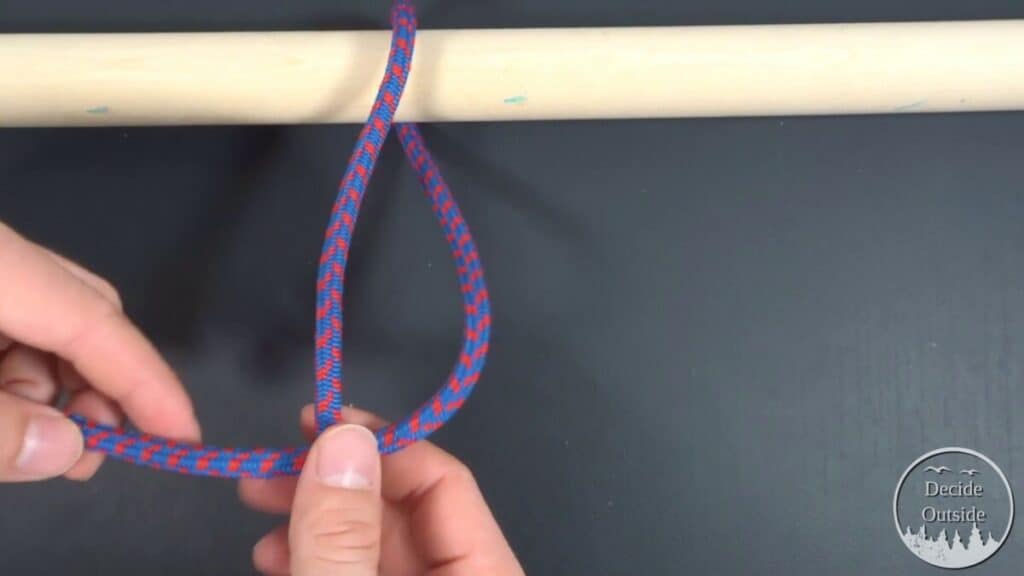
Step 2: Make an overhand clockwise crossing turn (see glossary for details)
Step 3: Make a half hitch by passing the rope around the standing part and through itself
Step 4: Pass the working end back around the standing part, forming an X.
Step 5: Pass the working end back around the standing part, the working end should go under the previous wrap.
Step 6: Pull the working end through (should look like a clove hitch)
Step 7: Put the working end over the standing part on the other side of the initial half hitch
Step 8: Wrap the working end around the standing part and pass it through forming a half hitch
Step 9: Pull the working end through to tighten the half hitch
Step 10: Tighten all wraps around each other, you can pull the knot away from the hitching object to tighten the rope. (adding more rope to the loop)
Finished Taut-line Hitch
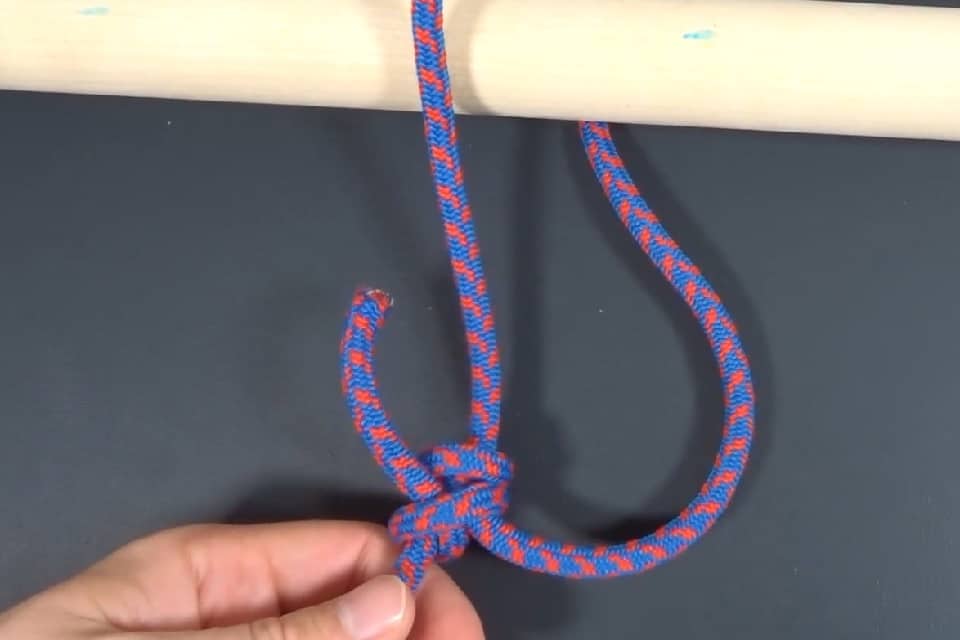
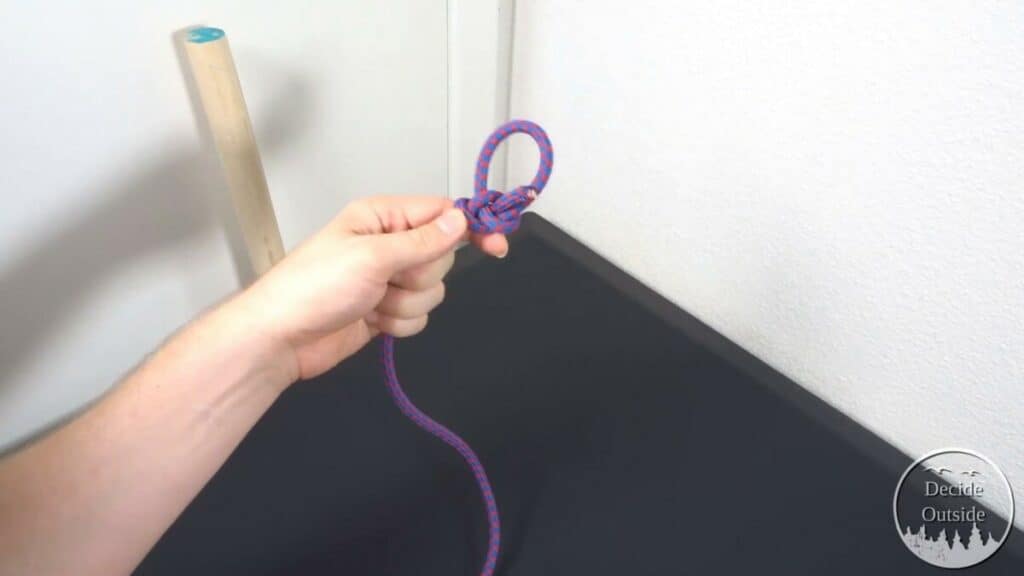
Anchor Bend
The Anchor Bend is actually a Hitch, and it’s one of my favorite hitches because it’s secure (especially when doubled), and it’s fairly easy to tie and remember.
If you need to tie around a loop or another object (especially cylindrical) and you don’t want the hitch to come undone, this is a great hitch to check out.
When To Use the Anchor Bend
- When you need to tie to a loop or other anchor point
- If you want a hitch that doesn’t let go (literally could use this for tying an anchor)
- Tying your boat to shore
How To Tie the Anchor Bend Video Instructions
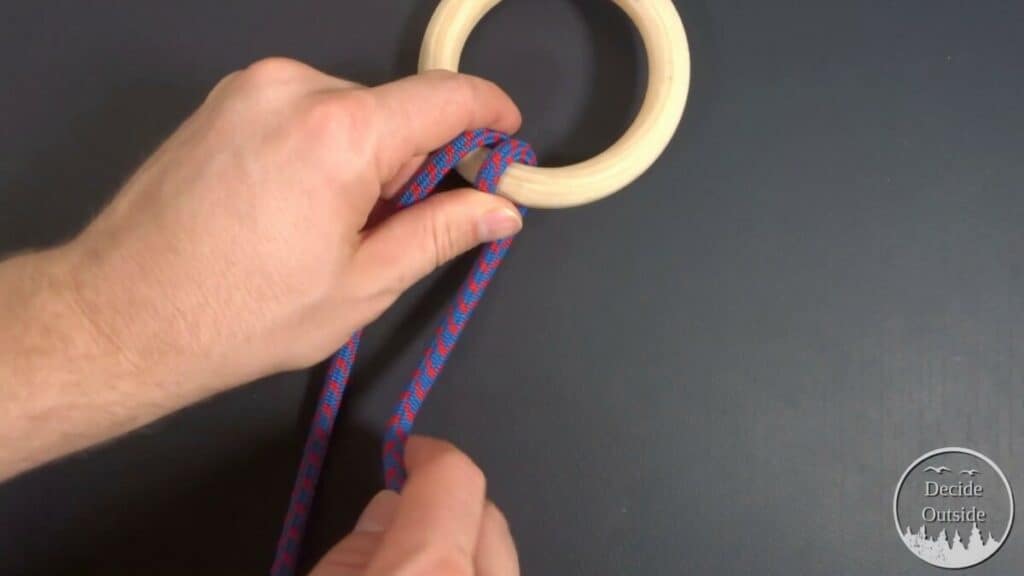
How To Tie the Anchor Bend Picture Instructions
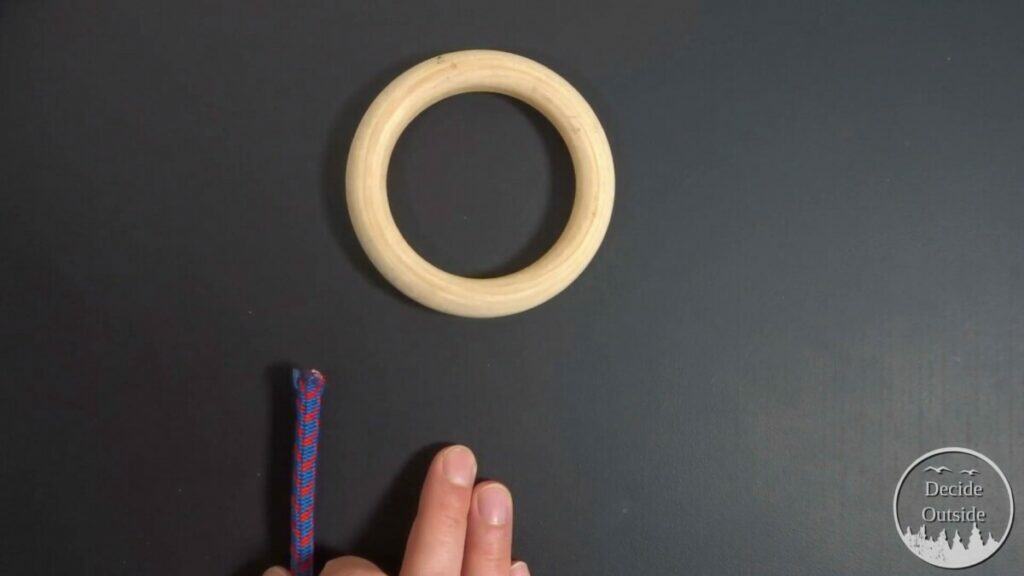
Step 1: Get your rope and the thing you want to hitch to, or a ring.
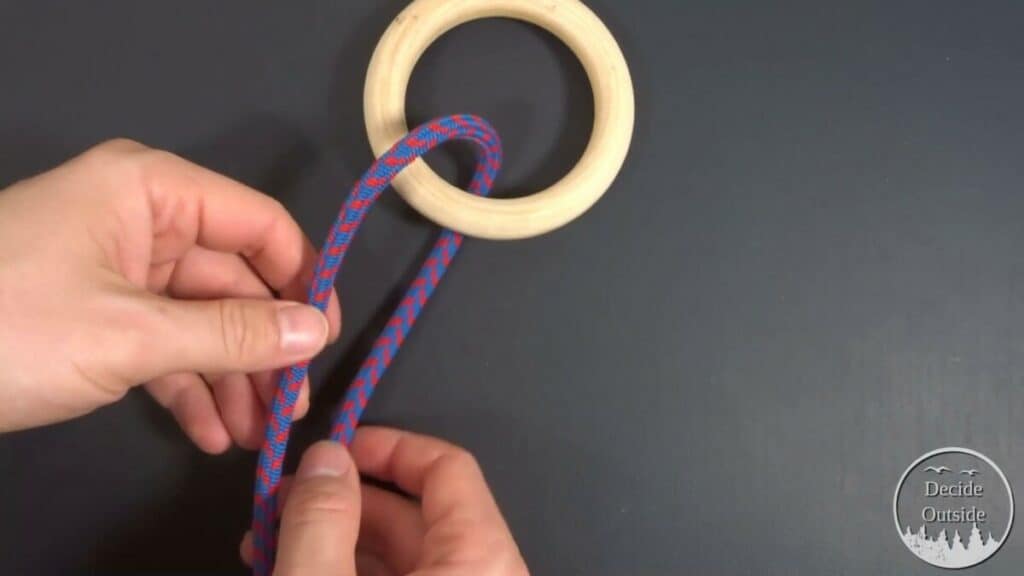
Step 2: Put the working end through the ring or around the thing you are hitching around clockwise.
Step 3: Form a round turn by going around the ring or thing you are hitching around in the same direction.
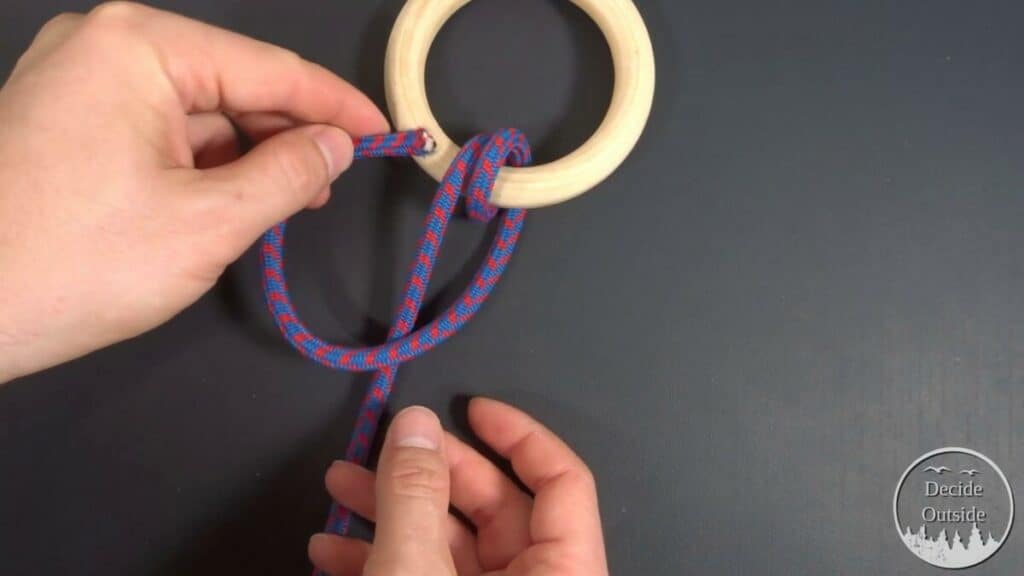
Step 4: Take the working end over the top of the standing part
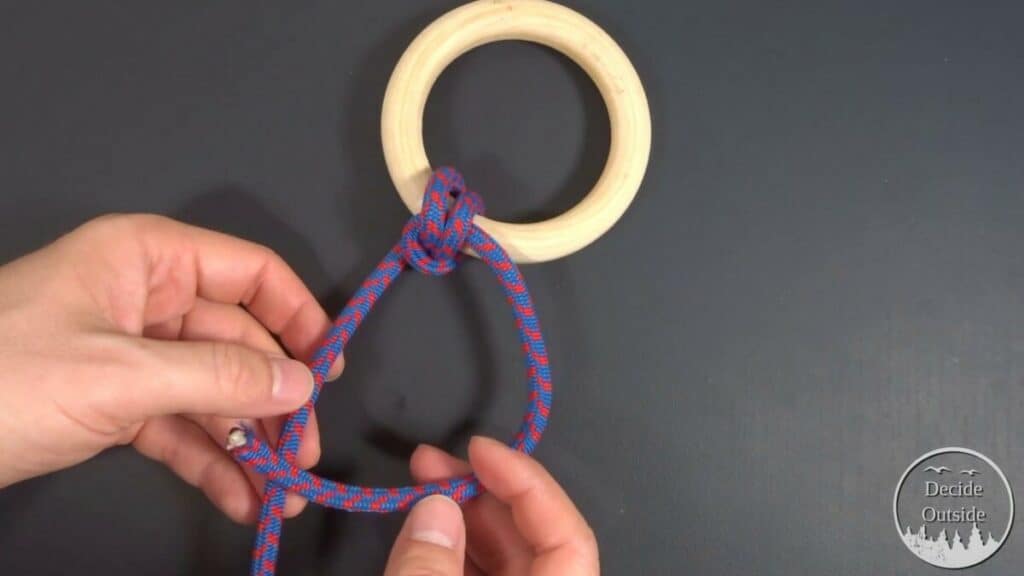
Step 5: Go through the two parallel lines that are wrapped the ring or thing you’re hitching around.
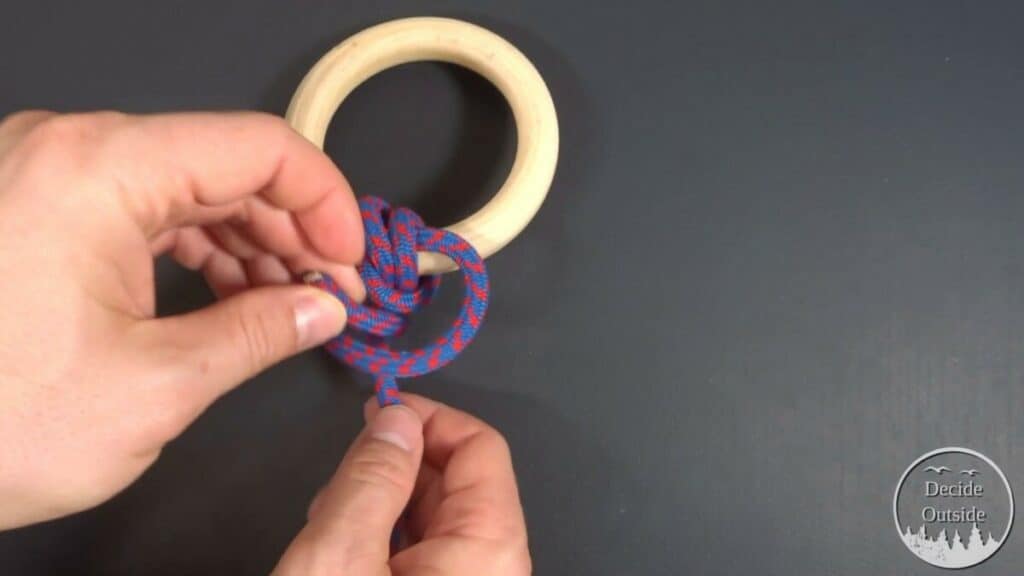
Step 6: Tie off the anchor bend with a half hitch on the standing part
Trucker’s Hitch
The trucker’s hitch is one of the most powerful tensioning specialty knots you can find. You can tighten a rope extremely tight and keep it in place for as long as necessary.
The Trucker’s Hitch is one of those knots that seems complicated–and it took me a while to figure out how to explain. You’re essentially creating a pulley with the rope to assist you in tightening a line.
The trucker’s hitch can be used to make ridgelines, secure heavy loads, and other critical applications.
When To Use the Trucker’s Hitch
- Making a Ridgeline, for hammock or tarp shelters
- Securing heavy loads on your vehicle. If tied off correctly, it won’t slip.
- Anytime you need a tight but secure tensioner
How To Tie the Trucker’s Hitch Video Instructions
How To Tie the Trucker’s Hitch Picture Instructions
Step 1: On the opposite of where you tie the trucker’s hitch, make a fixed loop (like a bowline) and feed the rope through the loop.
Step 2: Put the working end around the side where you want to tighten the trucker’s hitch.
Step 3: Make an anchor point by using a slip knot or alpine butterfly.
Step 4: Feed the working end through the anchor point. This is now a pully that you can use to tighten the entire system.
Step 5: Make a half hitch to tie off when you have the tension that you want. The pictures are kind of bad, watch the video.

Finished Trucker’s Hitch
Are you tired of not knowing which knot to use and when? Check out my free 5-day knot course! You will learn 1 essential knot per day with detailed video and picture instructions. And you’ll get it in your email! Check it out here.